Exchange integration guide
This guide provides a quick reference for how to perform the most common tasks when an exchange or a similar application needs to interact with the Kadena blockchain. The information in this guide is similar to topics covered elsewhere in the documentation. For example, you can see similar information in the following topics:
However, this guide assumes that you are operating an exchange and need to interact with the Kadena blockchain programmatically using scripts and, potentially, automation.
This guide also assumes the following:
- You host one or more Chainweb nodes that you control and monitor.
- You have one or more Chainweb nodes that connect to the Kadena test network or main production network.
- You are familiar with Kadena single-key and multi-key accounts, account naming conventions, and the use of keysets. For more information about working with accounts and keys, see Accounts, keys, and principals.
- You want to use the Kadena client libraries to write scripts that perform common tasks, like creating transactions and listening for events.
This guide includes code examples written in TypeScript for all of the common exchange-related activity. If you aren't already hosting your own Chainweb node, see Get started running a node for an introduction to setting up a Chainweb node.
Connect to specific chains
You can interact with the Kadena network through any of its separate chains. The chains—with chain identifiers 0 through 19—share a common view of blockchain history through consensus, but operate independently and in parallel.
Because the chains operate independently and you must specify the chain identifier that you want to send transactions to, you can write a custom host generator function that specifies the node host name or IP address of the node you manage and the specific chains you want to interact with.
The following example illustrates creating a Kadena client connection that connects the host kadena-node.my-exchange.tld but only interacts with chains 0, 1, and 2:
// Import the createClient function from the library.
import { createClient } from '@kadena/client';

// This customHostGeneratorFunction specifies the chainweb-node hostname
// and specific chains for API calls.
const customHostGeneratorFunction = ({ networkId, chainId }) => {
  if (![0, 1, 2].includes(chainId)) {
    throw new Error('Exchange only conducts business on chains 0, 1, and 2.');
  }

  const hostname = 'kadena-node.my-exchange.tld';
  return `https://${hostname}/chainweb/0.0/${networkId}/chain/${chainId}/pact`;
};

// This call creates a client that can connect to the blockchain.
const client = createClient(customHostGeneratorFunction, {
  // Exchanges typically wait for more blocks to be confirmed by consensus.
  confirmationDepth: 10,
});
For more information about the @kadena/client libraries, see Get started with Kadena client.
For more information about interacting with the Kadena coin contract and developing custom interfaces, see the client-utils repository and npm package.
Generate an account on the blockchain
For exchanges, the recommended best practice is to use a multi-signature account to manage the funds that are owned by the exchange. With a multi-signature account, you can apply the four-eyes principle to require transactions to be approved by at least two people.
The four-eyes principle, sometimes referred to as the two-person rule, is a broadly-accepted security method that ensures certain activities—such as the transfer of assets—are approved by at least two authorized individuals. Exchanges can apply this principle to prevent errors, fraud, or malicious behavior using the built-in predicates for multi-signature accounts:
keys-allrequires all authorized account keys to sign every transaction.keys-2requires at least two of any number of authorized account keys to sign every transaction.keys-anyrequires that any single authorized account key signs every transaction.
Typically, exchanges use the keys-2 predicate for the account that manages funds owned by the exchange and two or more authorized account keys.
You can create a multi-signature account and associated keys by using any wallet that supports the Kadena network and native KDA currency. For example, you can create keys and accounts by using any of the following wallets:
-
Chainweaver v3 (built by Kadena). You can also import accounts and keys from previous versions of Chainweaver.
-
Kadena CLI Wallet (built by Kadena). You can also use
@kadena/kadena-clito import accounts and keys from previous versions of Chainweaver, from other wallets, or from public and private key pairs you've generated using other tools. -
Other Kadena ecosystem wallets. You can also create an account using any of the wallets developed by third parties that support the Kadena network.
Using Chainweaver
-
Open Chainweaver v3 and click Add new profile to create a wallet or Recover your wallet to import information from a backup file or recovery phrase.
If creating a new wallet, type a Profile name and select a security method. If recovering a wallet, provide the backup file or recovery phrase to import keys and accounts.
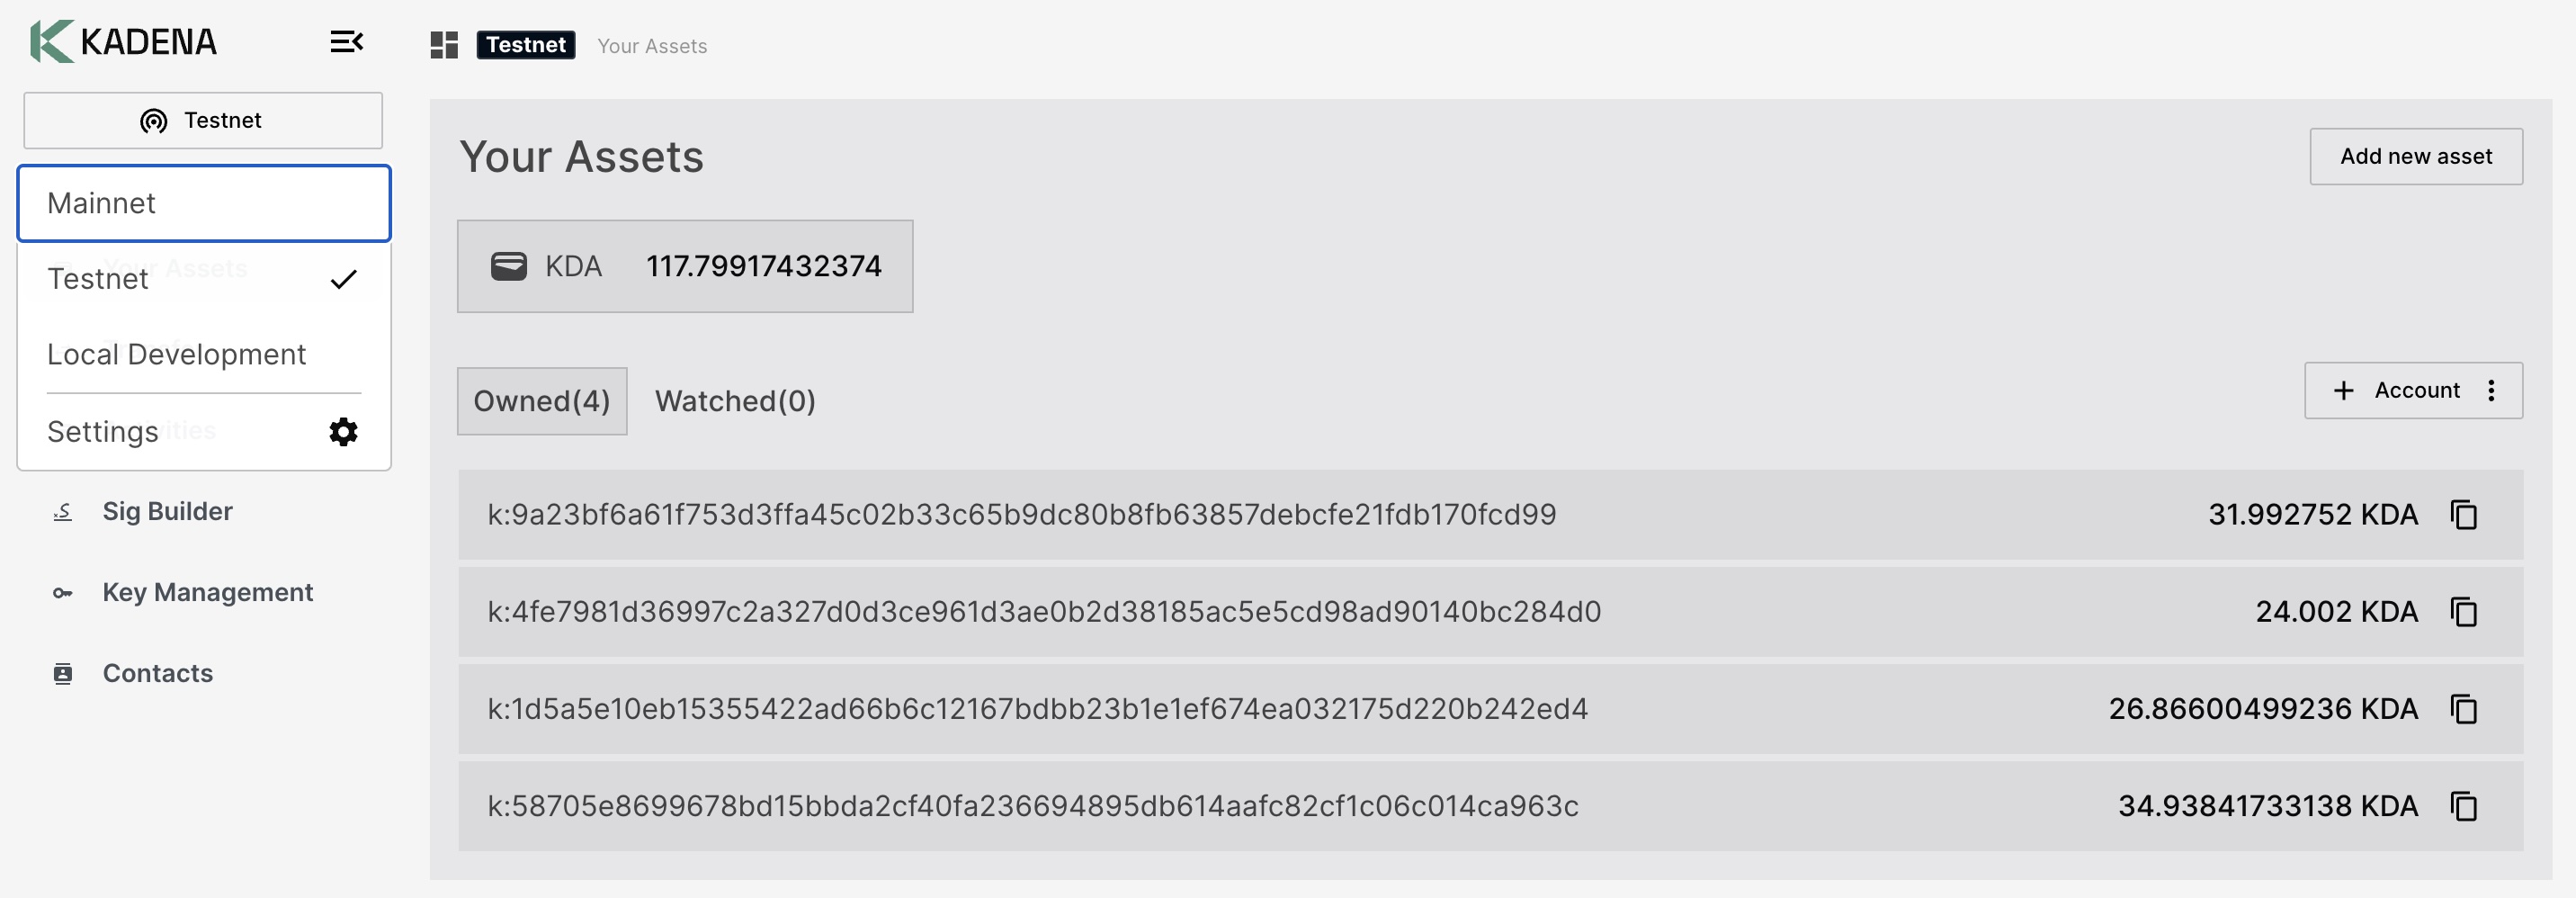
After creating or importing the wallet, the list of your assets on the Kadena Mainnet network is displayed by default. You can change the current network to Testnet or add another network by clicking Settings.
-
Click + Account, then select Create Multi-Sig.
-
Type an account alias name, select or enter the public keys for the account, and select a predicate, then click Create account.
- Fungible Contract: Select KDA (coin).
- Alias: Type an alias for the
w:account name. - Key: Select or enter each public key for the multi-signature account.
- Predicate: Select one of the built-in predicates to use for the multi-signature account.
-
Verify the new account is listed with a
w:prefix in the list of assets.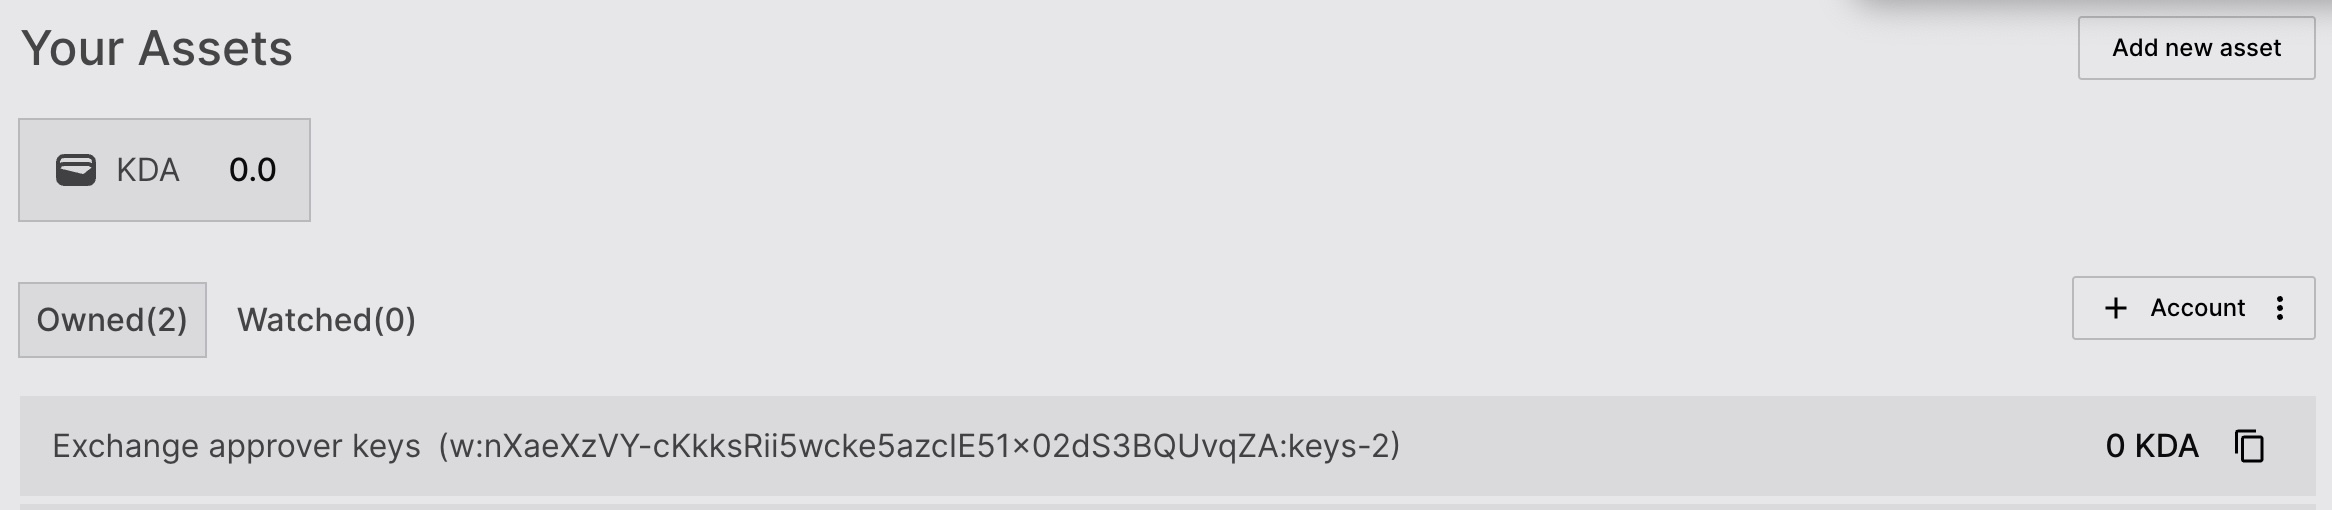
Note that the account has no funds. At this point, the account isn't associated with any of the chains in the network. You must add funds on at least one specific chain in the network you've selected for the account to become active and available for use.
If you are setting up this multi-signature account on the Testnet network, you can fund the account directly from Chainweaver by clicking Fund on Testnet in the account details, or by using the Developer Tools Testnet faucet.
-
Click the multi-signature account alias to view its details, then click Fund on Testnet to fund the account.

After the transaction is mined into a block, you can click Chain Distribution to see the chain that received funds on the Testnet network. If needed, you can transfer funds to your account on another chain.
If you're funding an account on the Mainnet network, you must acquire funds through another exchange.
Using mnemonic phrases
To use mnemonic phrases programmatically, you can use the @kadena/hd-wallet library.
For more information about this library, see the npm package.
Using client utilities
The following example demonstrates how to create a Kadena account with two public keys and the keys-2 predicate requiring both signatures to sign transaction on the Kadena main network and chain 0:
import { createAccount } from '@kadena/client-utils/coin';

const result = await createAccount(
  {
    account: 'k:' + publicKey,
    keyset: {
      pred: 'keys-2',
      keys: [publicKeyA, publicKeyB], // two public keys for a 2-of-2 multisig
      // keys: [publicKeyA, publicKeyB, publicKeyC], // three public keys for a 2-of-3 multisig
    },
    gasPayer: { account: 'gasPayer', publicKeys: [''] },
    chainId: '0',
  },
  {
    host: customHostGeneratorFunction,
    defaults: {
      networkId: 'mainnet01',
    },
    sign: signWithChainweaver,
  },
)
  // signed Tx
  .on('sign', (data) => console.log(data))
  // preflight result
  .on('preflight', (data) => console.log(data))
  // submit result
  .on('submit', (data) => console.log(data))
  // listen result
  .on('listen', (data) => console.log(data))
  .execute();
Retrieve balances
The following example illustrates using the getBalance function from the @kadena/client-utils library:
import { getBalance } from '@kadena/client-utils/coin';

const balance = await getBalance(
  'k:my-wallet-address',
  'mainnet01',
  '0', // chainId
  customHostGeneratorFunction, // You can pass the hostname or a generator function.
);
console.log(`Balance: ${balance}`);
Create, sign, and send a transaction
To create a transaction manually, you can combine the Pact.builder and Pact.modules functions:
Pact.builderto create an unsigned transaction request to execute in the transaction request.Pact.modules.<module>.<function>to create a Pact expression.
The following example demonstrates how create, sign, and send a transfer transaction manually using the @kadena/client library:
async function transfer(
  sender: string,
  senderAPublicKey: string,
  senderBPublicKey: string,
  receiver: string,
  amount: IPactDecimal,
): Promise<void> {
  const transaction = Pact.builder
    .execution(
      // pact expression
      Pact.modules.coin.transfer(sender, receiver, amount),
    )
    // add signers
    .addSigner(senderAPublicKey, (signFor) => [
      // add capabilities
      signFor('coin.GAS'),
      signFor('coin.TRANSFER', sender, receiver, amount),
    ])
    // if second signer is needed due to `keys-2` predicate on the `sender` account
    .addSigner(senderBPublicKey, (signFor) => [
      signFor('coin.TRANSFER', sender, receiver, amount),
    ])
    // set chainId and sender
    .setMeta({ chainId: '0', senderAccount: sender })
    .setNetworkId('mainnet01')
    // will create a IUnsignedTransaction { cmd, hash, sigs }
    .createTransaction();

  const signedTx = await signWithChainweaver(transaction);

  // create client
  const client = createClient(customHostGeneratorFunction, {
    confirmationDepth: 10,
  });

  // check if all necessary signatures are added
  if (isSignedTransaction(signedTx)) {
    const transactionDescriptor = await client.submit(signedTx);
    const response = await client.listen(transactionDescriptor, {});
    if (response.result.status === 'failure') {
      throw response.result.error;
    } else {
      console.log(response.result);
    }
  }
}

// run the function
transfer(senderAccount, senderPublicKey, receiverAccount, {
  decimal: '13.37',
}).catch(console.error);
The following code illustrates signing with a known public and secret keypair:
import { Pact, createClient, isSignedTransaction, createSignWithKeypair } from '@kadena/client';
import { IKeyPair } from '@kadena/client';

async function transfer(
  sender: string,
  senderAPublicKey: string,
  senderBPublicKey: string,
  receiver: string,
  amount: IPactDecimal,
): Promise<void> {
  const unsignedTransaction = Pact.builder
    .execution(
      // pact expression
      Pact.modules.coin.transfer(sender, receiver, amount),
    )
    // add signers
    .addSigner(senderPublicKey, (signFor) => [
      // add capabilities
      signFor('coin.GAS'),
      signFor('coin.TRANSFER', sender, receiver, amount),
    ])

    // set chainId and sender
    .setMeta({ chainId: '0', senderAccount: sender })
    .setNetworkId('mainnet01')
    // will create a IUnsignedTransaction { cmd, hash, sigs }
    .createTransaction();

    const knownKeyPair:IKeyPair = {
      publicKey:
        "02b055c8be0eeaa659d0927f3e2399080c91f3fdf94d079498b04d6987acbd46",
      secretKey:
        '5a02489796c9ec2ec74edf15b63140224d0516ce6cd8f62303ac63b56a45c336',
    };

    // create client
    const client = createClient(customHostGeneratorFunction, {
      confirmationDepth: 10,
    });

    const signWithKeypair = createSignWithKeypair([knownKeyPair]);
    const signedTx = await signWithKeypair(unsignedTransaction);

    const preflightResponse = await client.preflight(signedTx);

  if (preflightResponse.result.status === 'failure') {
    throw preflightResponse.result.error;
  }

  if (isSignedTransaction(signedTx)) {
    const transactionDescriptor = await client.submit(signedTx);
    const response = await client.listen(transactionDescriptor);
    if (response.result.status === 'failure') {
      throw response.result.error;
    } else {
      console.log(response.result);
    }
  }
};
Note that you can also use transaction templates and @kadena/kadena-cli to create, sign, and send transactions. You can automate the flow by using command-line options to execute transactions without interactive prompts. For more information about using @kadena/kadena-cli to automate transaction processing, see Kadena-cli commands.
Check the status of a transaction
There are two primary ways to check the status of a transaction programmatically:
- You can check the status of a single transaction by passing the
requestKeyhash for the transaction when calling thegetStatusfunction. - You can poll for the status of one or more transactions until the transaction request returned a result.
Single check
const client = createClient(/* omitted options, see "Low Level Client"*/);
// requestKey is the hash of the submitted transaction
client.getStatus({ chainId, networkId, requestKey });
Polling check
client.pollStatus(
  { networkId: 'mainnet01', chainId: '0', requestKey: 'tx-hash' },
  { confirmationDepth: 10 },
);
Estimate gas usage
To get an estimation of the gas usage, you can execute a local call.
Note that the gas estimation can be different from the actual gas by a transaction when the transaction is executed on the blockchain. State changes that are recorded on the blockchain can influence the branches the code takes, and, as a result, affect the gas required to execute the transaction.
// We do not need to send signatures to check gas estimation.
// However, signatures can influence the direction of the code, thus gas usage.
const response = await client.local(unsignedTx, {
  preflight: true,
  signatureVerification: false,
});

if (response.result.status === 'failure') {
  throw response.result.error;
}

const gasEstimation = response.gas;
Listen for events
There are several ways you can listen for events emitted by transactions that are executed on the blockchain.
For example, you can listen for coin.TRANSFER events in the following ways:
-
Use the
chainweb-streamserver package with the@kadena/chainweb-stream-clientto listen for specific events. -
Use third-party indexing services such as Kadindexer or Tatum to listen for specific events.
-
Implement a custom listener using the
@kadena/chainwebjspackage.
Monitoring and incident management
As an exchange, it is particularly important for you to monitor node operations and network activity. If you notice suspicious transactions or are informed about unusual transaction activity, you should work with mining node operators and pool node operators to determine if the transaction is preventing other transactions from being processed, consuming excessive resources, or causing any nodes to fail. Often, adjusting transaction fees can mitigate transaction processing delays and minimize the effect for end users who are submitting transactions.
If the network experiences an incident affecting transaction processing, you should pause all deposit and withdrawal activity until normal operations resume.