Define a namespace
In the Kadena ecosystem, a namespace is conceptually similar to a domain except that the name is a static prefix that establishes a boundary for the contracts, keysets, and modules that you control.
When you are building, testing, and deploying smart contracts on your local development network, you don't need to define a namespace. Your work is isolated from others because your blockchain—and any smart contracts you deploy—run exclusively on your local computer.
However, if you want to deploy a smart contract on the Kadena test network or another public blockchain, the contract must have a unique name that distinguishes your Pact module from all the others. If you try to deploy a Pact module with a name that's already being used on the network where you are trying to deploy, the deployment will fail with an error and you'll pay a transaction fee for the failed attempt.
To prevent name collisions on the same network, Kadena allows you to define your own unique namespace on the blockchain. The namespace segregates your work—your smart contracts, keyset definitions, and Pact modules—from applications and modules created and deployed by others. Within your namespace, you can define whatever keysets and modules you need and control who can update the namespace with changes. As long as you choose a unique name for your namespace, everything you define inside of that namespace is automatically unique, too.
In this tutorial, you'll learn how to define a namespace for the election application and how to use that namespace in the remaining tutorials. If you want to learn more about namespaces and how they are used before continuing, see An Introductory Guide to Kadena Namespaces.
Before you begin
Before you start this tutorial, verify the following basic requirements:
- You have an internet connection and a web browser installed on your local computer.
- You have a code editor, such as Visual Studio Code, access to an interactive terminal shell, and are generally familiar with using command-line programs.
- You have cloned the voting-dapp repository to create your project directory as described in Prepare your workspace.
- You have the development network running in a Docker container as described in Start a local blockchain.
- You are connected to the development network using your local host IP address and port number 8080.
- You have created and funded an administrative account as described in Add an administrator account.
Write a test transaction in Pact
In this tutorial, you'll write and execute some code using the Pact smart contract programming language and the Pact read–evaluate–print-loop (REPL) command-line interpreter. The Pact REPL supports many native built-in functions to help you write tests for Pact modules. You can find reference information for these built-in functions in the repl section.
To write a simple test transaction in Pact:
-
Open the
election-workshop/pactfolder in the code editor on your computer. -
Create a new file named
namespace.replin thepactfolder. -
Write an empty transaction by adding the
begin-txandcommit-txbuilt-in functions in thenamespace.replfile:(begin-tx "Define a namespace called 'election")
;; This is an empty transaction
(commit-tx) -
Save your changes.
-
Open a terminal shell in the code editor, if necessary, and change to the
pactfolder. -
Execute the code in the
namespace.replfile using the Pact command-line interpreter and the--tracecommand-line option.For example:
pact namespace.repl --traceYou should see that execution is successful with output similar to the following:
namespace.repl:0:0-0:48:Trace: "Begin Tx 0 Define a namespace called 'election"
namespace.repl:2:0-2:11:Trace: "Commit Tx 0 Define a namespace called 'election"
Load successful
Namespace built-in functions
Pact has two built-in functions to define and work inside of a namespace:
- The
define-namespacefunction enables you to define or redefine a namespace name and its access and ownership rules. - The
namespacefunction enable you to specify the namespace that you want to work with and will provide the context for the modules, keysets, and tables you define after entering the namespace.
To define a namespace, you must specify two keysets that control who can access the namespace as a user and who owns the namespace as an administrator.
- The user keyset can execute any public functions that are defined in the modules that are deployed in the namespace.
- The administrator keyset can deploy and modify the modules that are available in the namespace.
Calling the define-namespace function
As its name implies, you must call the define-namespace built-in function to create a namespace.
For this tutorial, you'll call this function inside the first transaction you created in the namespace.repl file.
To call the function, you must provide the following arguments:
- The unique name of the namespace.
- The keyset to read to determine who can use the namespace.
- The keyset to read to determine who owns the namespace and governs what it contains.
The following example illustrates defining an "election" namespace with keysets defined in the "user-keyset" and "admin-keyset" objects to be provided as environment data:
(define-namespace "election" (read-keyset "user-keyset") (read-keyset "admin-keyset"))
This call is all you need to define the "election" namespace.
However, your namespace.repl file can include REPL-specific built-in functions—such as the expect built-in function—as a wrapper to test that calling the define-namespace function will succeed.
To wrap the define-namespace function call with the expect built-in function, you must specify the following arguments:
- The title of the test.
- The expected output of the
define-namespacefunction. - The
define-namespacefunction call.
For example:
(expect
   "Test title: Namespace defined"
   "Expected output: Namespace successfully defined message"
   (define-namespace "election" (read-keyset "user-keyset") (read-keyset "admin-keyset"))
)
With this information, you're ready to define the "election" namespace in the namespace.repl file.
To define the "election" namespace:
-
Open the
election-workshop/pact/namespace.replfile in the code editor. -
Replace the
This is an empty transactioncommented line with theexpectbuilt-in function between thebegin-txandcommit-txfunction calls:(expect
"Test: Namespace can be successfully defined"
"Namespace defined: election"
(define-namespace "election" (read-keyset "user-keyset") (read-keyset "admin-keyset"))
)If you execute the transaction using the
pact namespace.repl --tracecommand at this point, the transaction will fail because the"user-keyset"and"admin-keyset"are required arguments for thedefine-namespacefunction, and you haven't provided this information in thenamespace.replfile yet. Because there are no keysets available to read, the transaction would fail with output similar to the following:namespace.repl:0:0-0:48:Trace: "Begin Tx 0 Define a namespace called 'election"
namespace.repl:1:2-5:3:Trace: "FAILURE: Test: Namespace can be successfully defined evaluation of actual failed with error message:
read-keyset failure"
namespace.repl:6:0-6:11:Trace: "Commit Tx 0 Define a namespace called 'election"
namespace.repl:1:2-5:3:FAILURE: Test: Namespace can be successfully defined evaluation of actual failed with error message:
read-keyset failure
Load failedFor the transaction to succeed, you must first add the
user-keysetandadmin-keysetinto the environment—using theenv-databuilt-in function—so that the information can be read in thedefine-namespacefunction call. Theenv-datafunction enables you to specify a real keyset with one or more public keys and a predicate or to simulate a keyset with an arbitrary string in place of the public key. For example, you can define a keyset namedjoewith an arbitrary string and the default predicate for use in the Pact REPL like this:(env-data
{ "joe":
{"keys": ["joe-key"]}
}
)In this tutorial, the keyset names are
user-keysetandadmin-keyset, so those are the keysets you need to specify or simulate in the environment data. -
Add the
user-keysetandadmin-keysetinto the environment by calling theenv-datafunction at the top of thenamespace.replfile:(env-data
{ "user-keyset" :
{ "keys" : [ "user-public-key" ]
, "pred" : "keys-all"
}
, "admin-keyset" :
{ "keys" : [ "admin-public-key" ]
, "pred" : "keys-all"
}
}
) -
Execute the code in the
namespace.replfile using the Pact command-line interpreter and the--tracecommand-line option.pact namespace.repl --traceYou'll see that the transaction succeeds with output similar to the following:
namespace.repl:0:0-10:1:Trace: "Setting transaction data"
namespace.repl:12:0-12:48:Trace: "Begin Tx 0 Define a namespace called 'election"
namespace.repl:13:2-17:3:Trace: "Expect: success Test: Namespace can be successfully defined"
namespace.repl:18:0-18:11:Trace: "Commit Tx 0 Define a namespace called 'election"
Load successful
You now have a namespace called
electiondefined in the Pact REPL.
Modify the namespace
After you define a namespace, only the admin-keyset—the namespace owner—can update the namespace.
You can test this behavior by creating a new transaction to modify the namespace to allow the user-keyset to govern the namespace and limit the admin-keyset to only use the namespace.
To test modifying the "election" namespace:
-
Open the
election-workshop/pact/namespace.replfile in the code editor. -
Add a second transaction to redefine the access and ownership rules for the
electionnamespace at the bottom of thenamespace.replfile with the following lines of code:(begin-tx "Update the 'election' namespace")
(expect
"An admin can modify the namespace to change the keyset governing the namespace"
"Namespace defined: election"
(define-namespace "election" (read-keyset "admin-keyset") (read-keyset "user-keyset"))
)
(commit-tx)If you execute the transaction using the
pact namespace.repl --tracecommand at this point, you'll see that the transaction fails with aKeyset failuremessage similar to the following:...
namespace.repl:20:0-20:44:Trace: "Begin Tx 1 Update the 'election' namespace"
namespace.repl:21:0-25:1:Trace: "FAILURE: An admin can modify the namespace to change the keyset governing the namespace evaluation of actual failed with error message:
Keyset failure (keys-all): [admin-pu...]"
namespace.repl:26:0-26:11:Trace: "Commit Tx 1 Update the 'election' namespace"
namespace.repl:21:0-25:1:FAILURE: An admin can modify the namespace to change the keyset governing the namespace evaluation of actual failed with error message:
Keyset failure (keys-all): [admin-pu...]
Load failedBecause only the
admin-keysetis allowed to update the namespace, the second transaction must be signed by theadmin-keysetpublic key for the transaction to succeed. In the Pact REPL, you can use theenv-sigsbuilt-in function to sign the transaction with the public key from theadmin-keysetdefinition. -
Sign the transaction with the
admin-keysetby calling theenv-sigsfunction before the second transaction with the following lines of code:(env-sigs
[{ "key" : "admin-public-key"
, "caps" : []
}]
) -
Execute the code in the
namespace.replfile using the Pact command-line interpreter and the--tracecommand-line option.pact namespace.repl --traceYou'll see that the transaction succeeds with output similar to the following:
...
namespace.repl:20:0-24:1:Trace: "Setting transaction signatures/caps"
namespace.repl:26:0-26:44:Trace: "Begin Tx 1 Update the 'election' namespace"
namespace.repl:27:0-31:1:Trace: "Expect: success An admin can modify the namespace to change the keyset governing the namespace"
namespace.repl:32:0-32:11:Trace: "Commit Tx 1 Update the 'election' namespace"
Load successful
After this second transaction is successful, the
admin-keysetno longer governs theelectionnamespace.
Verify the admin-keyset doesn't govern the namespace
Now that you have successfully modified the election namespace, you can no longer use the admin-keyset to sign transactions that modify the namespace.
You can confirm this behavior by adding a third transaction that attempts to redefine the namespace with the same permissions that you used when you initially created the namespace.
This third transaction is expected to fail because the admin-keyset no longer governs the namespace after the second transaction.
Therefore, for this example, you can wrap the define-namespace function inside of an expect-failure function to assert that redefining the namespace is expected to fail.
To verify that redefining the election namespace fails:
-
Open the
election-workshop/pact/namespace.replfile in the code editor. -
Add a third transaction to test that the
admin-keysetcan't update the namespace at the bottom of thenamespace.replfile:(begin-tx "Try to update the 'election' namespace with the wrong permissions")
(expect-failure
"The previous admin can no longer update the namespace"
"Keyset failure (keys-all)"
(define-namespace "election" (read-keyset "user-keyset") (read-keyset "admin-keyset"))
)
(commit-tx) -
Execute the code in the
namespace.replfile using the Pact command-line interpreter and the--tracecommand-line option.pact namespace.repl --traceYou'll see that the redefining the namespace fails—as expected—with output similar to the following:
...
namespace.repl:34:0-34:78:Trace: "Begin Tx 2 Try to update the 'election' namespace with the wrong permissions"
namespace.repl:35:3-39:1:Trace: "Expect failure: Success: The previous admin can no longer update the namespace"
namespace.repl:40:0-40:11:Trace: "Commit Tx 2 Try to update the 'election' namespace with the wrong permissions"
Load successful
Verify the user-keyset governs the namespace
To verify that the user-keyset can now redefine the namespace, you can load the signature for the user-keyset into the Pact REPL and write a fourth transaction to redefine the namespace.
To verify that redefining the "election" namespace succeeds:
-
Open the
election-workshop/pact/namespace.replfile in the code editor. -
Add the signature for the
user-keysetand a fourth transaction that allows theuser-keysetto redefine the "election" namespace with the following lines of code:(env-sigs
[{ "key" : "user-public-key"
, "caps" : []
}]
)
(begin-tx "Redefine a namespace called 'election as the new admin")
(expect
"The new admin can update the namespace"
"Namespace defined: election"
(define-namespace "election" (read-keyset "user-keyset") (read-keyset "admin-keyset"))
)
(commit-tx) -
Execute the code in the
namespace.replfile using the Pact command-line interpreter and the--tracecommand-line option.pact namespace.repl --traceYou'll see that all of the transactions succeed—including the transaction that restores the
admin-keysetas the namespace owner—with output similar to the following:...
namespace.repl:42:0-46:3:Trace: "Setting transaction signatures/caps"
namespace.repl:47:2-47:69:Trace: "Begin Tx 3 Redefine a namespace called 'election as the new admin"
namespace.repl:48:2-52:3:Trace: "Expect: success The new admin can update the namespace"
namespace.repl:53:2-53:13:Trace: "Commit Tx 3 Redefine a namespace called 'election as the new admin"
Load successful
Create a principal namespace in the Pact REPL
So far, you've seen how to define and update a namespace, but the define-namespace function doesn't guarantee that your namespace would have a unique name that isn't being used by anyone else.
To ensure your namespace has a unique name, Kadena provides a default ns module for managing namespaces on the main, test, and development networks.
The ns module includes a create-principal-namespace built-in function that you can call to create a uniquely-named principal namespace on any Kadena network.
The create-principal-namespace function creates a unique namespace by appending the n_ prefix to the hash of a specified keyset.
This naming convention ensures that your principal namespace won't conflict with any other namespaces defined in the same network.
Unlike previous examples where you could simulate the public key for a keyset, the ns.create-principal-namespace function requires you to specify a valid public key for a keyset.
The following example demonstrates how to create a principal namespace that uses the public key for the sender00 test account.
To create a principal namespace:
-
Open the
election-workshop/pactfolder in the code editor. -
Create a new file named
principal-namespace.replin thepactfolder. -
Load the
admin-keysetwith the public key of thesender00account into the context of the Pact REPL by adding the following lines at the top of theprincipal-namespace.replfile:(env-data
{ "admin-keyset" :
{ "keys" : [ "368820f80c324bbc7c2b0610688a7da43e39f91d118732671cd9c7500ff43cca" ]
, "pred" : "keys-all"
}
}
) -
Load the
nsmodule from the local filesystem to make it available in the Pact REPL by adding the following lines of code to theprincipal-namespace.replfile:(begin-tx)
(load "root/ns.pact")
(commit-tx)Loading the
nsmodule from the local./pact/rootfolder of the project is only required because the Pact REPL doesn't deploy thensmodule by default. -
Add a transaction to create the principal namespace in the
principal-namespace.replfile:(begin-tx "Define a principal namespace")
(expect
"A principal namespace can be created"
"Namespace defined: n_560eefcee4a090a24f12d7cf68cd48f11d8d2bd9"
(define-namespace (ns.create-principal-namespace (read-keyset "election-admin")) (read-keyset "election-admin") (read-keyset "election-admin"))
)
(commit-tx)In this code:
- The
ns.create-principal-namespacefunction reads theadmin-keysetfrom the environment data to create a unique hash value associated with the public key for the administrative account. - The output of the
ns.create-principal-namespacefunction is stored in thens-namevariable. - The
define-namespacefunction takes the output stored in thens-namevariable as its first argument to create the unique name for the namespace.
The code is similar to the code you wrote in the
namespace.replfile except that you're using thensmodule and passing thens-namevariable instead of using a hardcodedelectionstring. - The
-
Execute the code in the
principal-namespace.replfile using the Pact command-line interpreter and the--tracecommand-line option.pact principal-namespace.repl --traceYou'll see that the transaction succeeds with output similar to the following:
principal-namespace.repl:0:0-6:1:Trace: "Setting transaction data"
principal-namespace.repl:7:0-7:10:Trace: "Begin Tx 0"
principal-namespace.repl:8:3-8:24:Trace: "Loading root/ns.pact..."
root/ns.pact:0:0-94:1:Trace: Loaded module ns, hash eAnZwwSKgXn0OT0gYVyuvr7BdEoUE9qgDx_jgnKoxlI
principal-namespace.repl:9:0-9:11:Trace: "Commit Tx 0"
principal-namespace.repl:11:0-11:41:Trace: "Begin Tx 1 Define a principal namespace"
principal-namespace.repl:12:3-18:1:Trace: "Expect: success A principal namespace can be created"
principal-namespace.repl:19:0-19:11:Trace: "Commit Tx 1 Define a principal namespace"
Load successful
In this example, you defined a principal namespace using the public key for the sender00 test account.
The next step demonstrates how you can define a principal namespace on the development network using the administrative account you created in Add an administrator account.
Create your own principal namespace
Now that you've seen how to use the define-namespace and create-principal-namespace functions, you're ready to create your own principal namespace on your local development network with the administrative account that you created previously.
There are several ways you can create a transaction to define a principal namespace, including by creating a YAML API request to submit to the /send endpoint or by using the election-workshop/snippets/principal-namespace.ts sample script.
This tutorial demonstrates how to create a principal namespace by using kadena tx commands.
To create a principal namespace on the development network:
-
Verify the development network is currently running on your local computer.
-
Open your code editor and navigate to
transaction-templatesin the.kadenaconfiguration folder.For example, open the
~/.kadena/transaction-templatesfolder in your code editor. -
Create a new transaction template (
.ktpl) file.For example, create a
election-namespace.ktplfile in the~/.kadena/transaction-templatesfolder. -
Create a transaction request using the YAML API request format with content similar to the following using the public key for the
election-adminadministrator account you created in Add an administrator account.In the following example, all of the fields are explicitly set and
d0aa32802596b8e31f7e35d1f4995524f11ed9c7683450b561e01fb3a36c18aeis the public key for theelection-adminaccount name created in Add an administrator account:code: |-
(define-namespace (ns.create-principal-namespace (read-keyset "election-admin")) (read-keyset "election-admin") (read-keyset "election-admin"))
)
data:
election-admin:
keys: [d0aa32802596b8e31f7e35d1f4995524f11ed9c7683450b561e01fb3a36c18ae]
pred: "keys-all"
meta:
chainId: "3"
sender: "election-admin"
gasLimit: 80300
gasPrice: 0.000001
ttl: 600
signers:
- public: "d0aa32802596b8e31f7e35d1f4995524f11ed9c7683450b561e01fb3a36c18ae"
caps: []
networkId: "development"One of the advantages of using
kadena txcommands to create a transaction is that you can create transaction requests that are reusable templates. To create a reusable transaction request, you can replace the explicit values from the previous example with template variables. For example:code: |-
(define-namespace (ns.create-principal-namespace (read-keyset "election-admin")) (read-keyset "election-admin") (read-keyset "election-admin"))
data:
election-admin:
keys: ["{{public-key}}"]
pred: "keys-all"
meta:
chainId: "{{chain-id}}"
sender: "{{{sender-account}}}"
gasLimit: 80300
gasPrice: 0.000001
ttl: 600
signers:
- public: "{{public-key}}"
caps: []
networkId: "{{network-id}}" -
Create a transaction that uses the template by running the
kadena tx addcommand and following the prompts displayed.For example:
kadena tx add
? Which template do you want to use: election-namespace.ktpl
? File path of data to use for template .json or .yaml (optional):
? Where do you want to save the output: election-principal-namespace
The content from the transaction template is converted into a properly-formatted JSON object and saved using the output file name you specify. In this example, the transaction is saved in the
election-principal-namespace.jsonfile in the current working directory. -
Sign the transaction by running the
kadena tx signcommand and following the prompts displayed.In this example, the transaction is signed using the public and secret keys that were generated using the
kadena key generatecommand and stored in the~/election-admin.yamlfile. For example:kadena tx sign
? Select an action: Sign with key pair
? Enter key pairs as a string (e.g: publicKey=xxx,secretKey=xxx;...): publicKey=d0aa3280...a36c18ae,secretKey=35003210...320e0c72
? Select a transaction file: Transaction: election-principal-namespace.jsonThe signed transaction is saved in the current working directory. In this example, the signed transaction is saved in the
transaction-zOwR73MEge-signed.jsonfile. -
Send the signed transaction to the blockchain by running the
kadena tx sendcommand and following the prompts displayed.For example:
kadena tx send
? Select a transaction file: Transaction: transaction-zOwR73MEge-signed.json
⠋ Sending transactions...

Transaction detail for command with hash: zOwR73MEgeGj3INpt9JoSR5zP5YTAcvM3Fc5M5y-iwM
Network ID  Chain ID
development 3

✔ Completed
Transaction: zOwR73MEgeGj3INpt9JoSR5zP5YTAcvM3Fc5M5y-iwM submitted with request key: zOwR73MEgeGj3INpt9JoSR5zP5YTAcvM3Fc5M5y-iwM

Executed:
kadena tx send --tx-signed-transaction-files="transaction-zOwR73MEge-signed.json" --tx-transaction-network="devnet" -
Verify the transaction results using the request key for the transaction.
For example, look up the transaction in the block explorer:
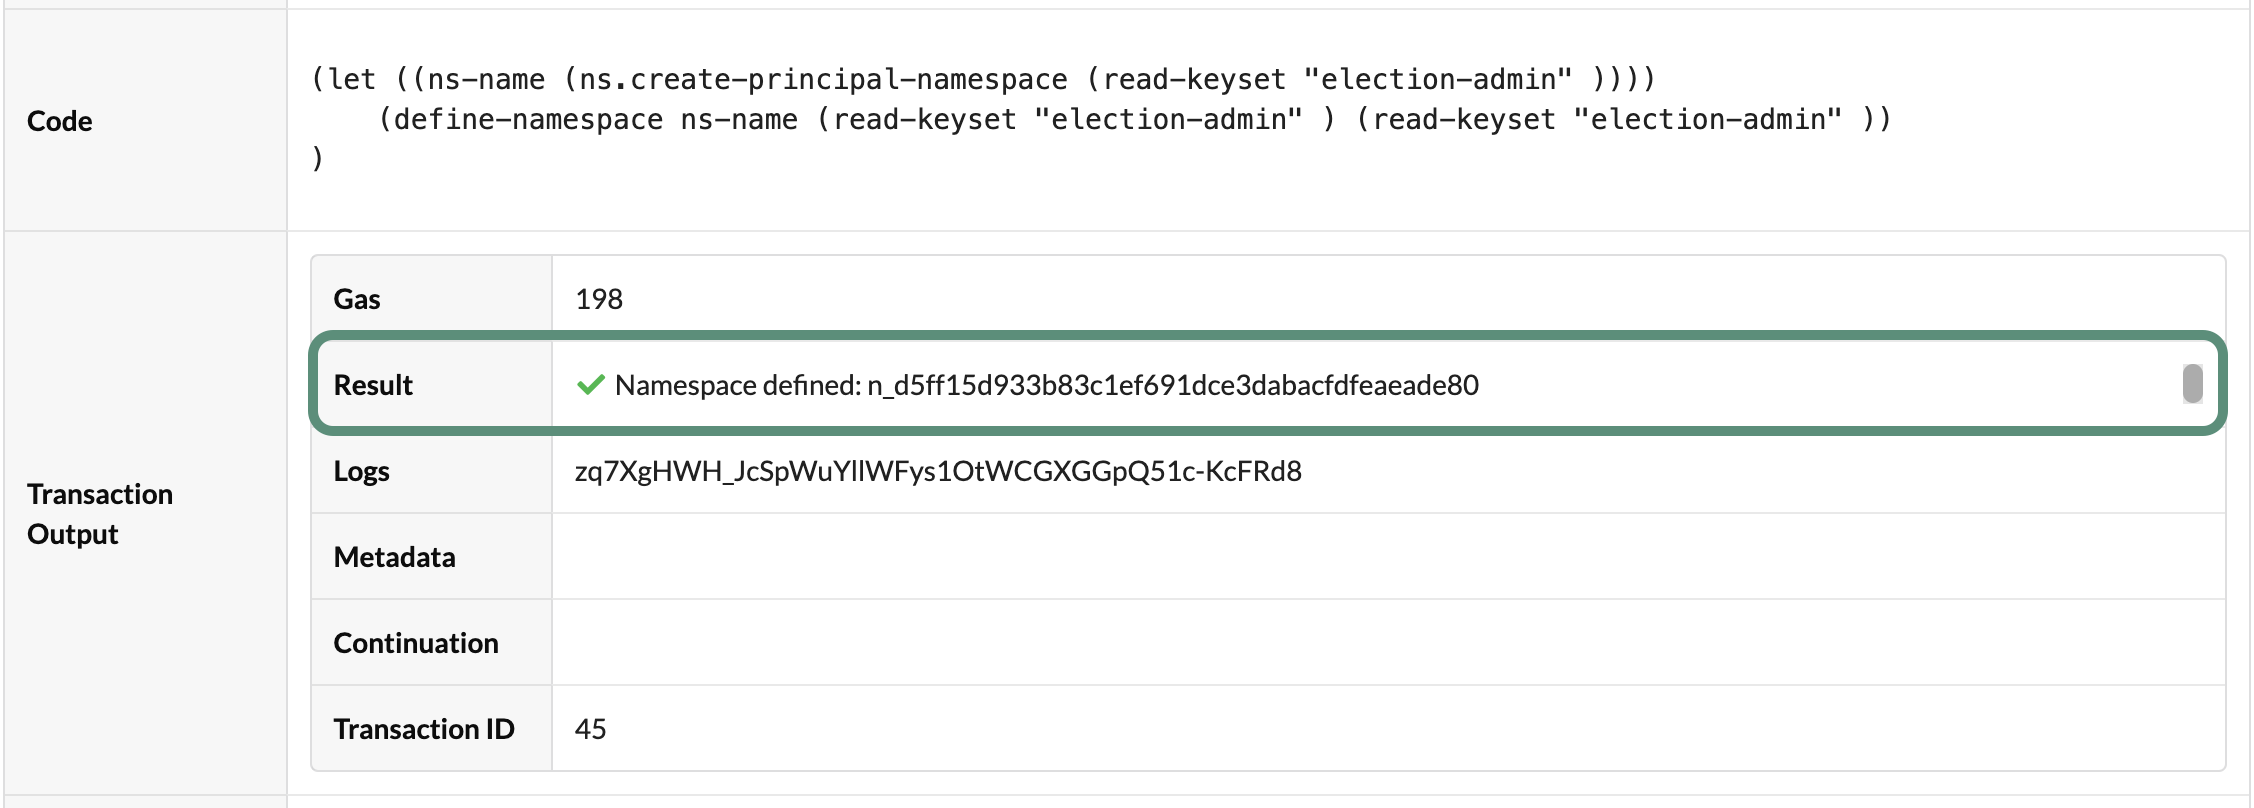
You now have a principal namespace defined in the development network.
In this example, the principal namespace n_d5ff15d933b83c1ef691dce3dabacfdfeaeade80 has been uniquely defined for the election-admin account.
Next steps
In this tutorial, you learned how to:
- Write simple test transactions and use built-in functions in the Pact REPL to test code using
.replfiles. - Define and update a namespace for the election application in the Pact REPL.
- Specify the keysets that are allowed to use and govern the namespace.
- Modify the keyset with permission to govern the namespace.
- Create and test a principal namespace locally before defining a namespace on the network.
- Create a principal namespace on the local development network that is governed by your administrative account.
The work you completed in this tutorial sets the groundwork for the next tutorial. In the next tutorial, you'll learn how to define a keyset inside your principal namespace and how the keyset you define is used to guard who can modify your election application smart contract.
To see the code for the activity you completed in this tutorial and get the starter code for the next tutorial, check out the 05-keysets branch from the election-workshop repository by running the following command in your terminal shell:
git checkout 05-keysets