Nominate candidates
In Write a smart contract, you learned about defining Pact modules and created a skeleton election module for the smart contract that will become the backend of the election application.
In this tutorial, you'll update the election module with a database table and functions to support the following operations:
- Store a list of candidates and the number of votes each candidate receives.
- Store a list of the accounts that have voted to ensure that every account can vote only once.
- Add nominated candidates to the candidate table.
- List all of the candidates that are stored in the table.
Before you begin
Before you start this tutorial, verify the following basic requirements:
- You have an internet connection and a web browser installed on your local computer.
- You have a code editor, such as Visual Studio Code, access to an interactive terminal shell, and are generally familiar with using command-line programs.
- You have cloned the voting-dapp repository to create your project directory as described in Prepare your workspace.
- You have the development network running in a Docker container as described in Start a local blockchain.
- You are connected to the development network using your local host IP address and port number 8080.
- You have created and funded an administrative account as described in Add an administrator account.
- You have created a principal namespace on the development network as described in Define a namespace.
- You have defined the keyset that controls your namespace using the administrative account as described in Define keysets.
- You have created a minimal election module using the Pact smart contract language as described in Write a smart contract.
Define the database schema and table
To prepare the election module database, you must first define a schema for the table.
You can then define a table that uses the schema inside the election module.
The actual creation of the table happens outside the Pact module declaration, as you saw with defining and entering a namespace.
To define the database schema and table:
-
Open the
election-workshop/pact/election.pactfile in the code editor on your computer. -
Add the schema for the database table inside of the
electionmodule declaration with the following lines of code:(defschema candidates-schema
"Candidates table schema"
name:string
votes:integer)
(deftable candidates:{candidates-schema})In this code,
defschemadefines acandidate-schemafor a database table namedcandidateswith two columns:nameof type stringvotesof type integer
-
Create the table outside of the election module by adding the following lines of code at the end of the
./pact/election.pactfile, after the closing parenthesis ()) of theelectionmodule declaration:(if (read-msg "init-candidates")
[(create-table candidates)]
[]
)With this code, the
read-msgfunction reads theinit-candidatesfield from the transaction data. If you set this field totruein the data for your module deployment transaction, the statement between the first square brackets—(create-table candidates)—is executed to create thecandidatestable based on its schema definition inside theelectionmodule.
Test table creation
Before trying to create the table on your local development network, you can verify that your changes work as expected by running some tests in the Pact REPL.
To test table creation:
-
Open the
election-workshop/pactfolder in the code editor. -
Create a new file named
election.replin thepactfolder. -
Set the
env-dataandenv-sigsfields for the REPL test environment to use the public key for your administrative account.For example:
(env-data
  { "election-admin":
      { "keys" : [ "d0aa32802596b8e31f7e35d1f4995524f11ed9c7683450b561e01fb3a36c18ae" ]
      , "pred" : "keys-all"
      }
  , "init-candidates": true
  }
)

(env-sigs
  [{ "key"  : "d0aa32802596b8e31f7e35d1f4995524f11ed9c7683450b561e01fb3a36c18ae"
   , "caps" : []
  }]
)
Also, notice that
init-candidates: trueis included in the environment data to ensure that the(create-table candidates)command is executed when you load theelectionmodule into the Pact REPL. -
Define your principal namespace and the
admin-keysetfor the namespace using the principal namespace you used in yourelection.pactfile.(begin-tx "Define the principal namespace")
(define-namespace "n_d5ff15d933b83c1ef691dce3dabacfdfeaeade80" (read-keyset "election-admin" ) (read-keyset "election-admin" ))
(commit-tx)
(begin-tx "Define the election-admin keyset in the namespace")
(namespace "n_d5ff15d933b83c1ef691dce3dabacfdfeaeade80")
(define-keyset "n_d5ff15d933b83c1ef691dce3dabacfdfeaeade80.election-admin" (read-keyset "election-admin" ))
(commit-tx)These transactions are required because, inside of the
election.pactfile, theelectionmodule is defined in your principal namespace and it is governed by theelection-adminin that namespace. -
Add a transaction to load the election module:
(begin-tx "Load election module")
  (load "election.pact")
(commit-tx) -
Execute the code in the
election.replfile using the Pact command-line interpreter and the--tracecommand-line option.pact election.repl --traceYou should see that the transaction succeeds with output similar to the following:
...
election.repl:0:0-7:1:Trace: "Setting transaction data"
election.repl:9:0-13:1:Trace: "Setting transaction signatures/caps"
election.repl:15:0-15:43:Trace: "Begin Tx 0 Define the principal namespace"
election.repl:16:2-16:129:Trace: "Namespace defined: n_d5ff15d933b83c1ef691dce3dabacfdfeaeade80"
election.repl:17:0-17:11:Trace: "Commit Tx 0 Define the principal namespace"
election.repl:19:0-19:62:Trace: "Begin Tx 1 Define the election-admin keyset in the namespace"
election.repl:20:2-20:58:Trace: "Namespace set to n_d5ff15d933b83c1ef691dce3dabacfdfeaeade80"
election.repl:21:2-21:109:Trace: "Keyset write success"
election.repl:22:0-22:11:Trace: "Commit Tx 1 Define the election-admin keyset in the namespace"
election.repl:24:0-24:33:Trace: "Begin Tx 2 Load election module"
election.repl:25:2-25:24:Trace: "Loading election.pact..."
election.pact:0:0-0:56:Trace: "Namespace set to n_d5ff15d933b83c1ef691dce3dabacfdfeaeade80"
election.pact:3:0-16:1:Trace: Loaded module n_d5ff15d933b83c1ef691dce3dabacfdfeaeade80.election, hash _zJBtnrLTTYsbTcnDk_qt13sJPfnlTTBJ13jz11x_Sc
election.pact:19:0-22:1:Trace: ["TableCreated"]
election.repl:26:0-26:11:Trace: "Commit Tx 2 Load election module"
Load successful
Update the list-candidates function
The current implementation of the list-candidates function returns a simple list.
Although it appears that the candidates table has been created successfully, the table doesn't have any data to return.
Before you can test that the candidates table works as expected, you must modify the code for the list-candidates function.
To update the list-candidates function to read data from a table:
-
Open the
election-workshop/pact/election.pactfile in your code editor. -
Update the return value of the
list-candidatesfunction to select all of the rows of thecandidatestable, including the key and the column values of each row.For example:
(defun list-candidates ()
  (fold-db candidates
    (lambda (key columnData) true)
    (lambda (key columnData) (+ { "key": key } columnData))
  ))
The
fold-dbfunction fetches the value of thekeycolumn separately from the other column values.- The first argument for
fold-dbis the table name. - The second argument is a predicate function that determines which rows should be selected.
To fetch all rows from a table, you can simply return
truehere. - The third argument is an accumulator function that allows you to map the data of each row to a different format.
This code example formats the return value of the
fold-dbfunction as a JSON object with the following structure.[
{ "key": "1", "name": "Candidate A", "votes": 0 },
{ "key": "2", "name": "Candidate B", "votes": 0 }
] - The first argument for
-
Open the
election-workshop/pact/election.replfile in the code editor. -
Add a transaction to test the new implementation of the
election.list-candidatesfunction:(begin-tx "List candidates")
(use n_d5ff15d933b83c1ef691dce3dabacfdfeaeade80.election)
(expect
"There are no candidates in the candidates table"
[]
(list-candidates)
)
(commit-tx) -
Execute the code in the
election.replfile using the Pact command-line interpreter and the--tracecommand-line option.pact election.repl --traceBecause there are no candidates in the table, you should see the transaction succeeds with output similar to the following:
...
election.repl:28:0-28:28:Trace: "Begin Tx 3 List candidates"
election.repl:29:2-29:59:Trace: Loaded imports from n_d5ff15d933b83c1ef691dce3dabacfdfeaeade80.election
election.repl:30:2-34:3:Trace: "Expect: success There are no candidates in the candidates table"
election.repl:35:0-35:11:Trace: "Commit Tx 3 List candidates"
Load successful
Note that you shouldn't include a call to a function like
fold-dbin transactions sent to the blockchain. Instead, you can make a local request to select all rows from a table to save gas. You'll learn more about making local requests later in this tutorial.
Add candidates
At this point, you have a database table for storing candidate names and the votes they've received, but without any candidates for anyone to vote on.
To add candidates to the database:
-
Open the
election-workshop/pact/election.pactfile in your code editor. -
Define a new
add-candidatefunction inside theelectionmodule declaration. You'll use this function to insert candidate information from a JSON object into each row in thecandidatestable. The function uses theinsertbuilt-in function to add each candidate to the table.(defun add-candidate (candidate:object)
(insert candidates
(at "key" candidate)
{
"name": (at "name" candidate),
"votes": 0
}
)
)In this code, you pass the following arguments to the
insertfunction:- The name of table you want to update.
In this case, the table is the
candidatestable. - The value for the key of the row to be inserted.
In this case, the value of the
keyfield is extracted from thecandidateobject. - The key-value object representing the row to be inserted into the table.
The object consists of a
namekey and avoteskey that correspond to the columns in the schema for thecandidatestable. In this case, thevotescolumn of the new value always gets a value0and thenamecolumn gets the name you specify in the JSON object.
Now that you've added the
add-candidatefunction to theelectionmodule, you can test it by adding tests to theelection.replfile. - The name of table you want to update.
In this case, the table is the
-
Open the
election-workshop/pact/election.replfile in your code editor. -
Add a transaction to test that candidates can be added to the database using the
election.add-candidatefunction:(begin-tx "Add candidates")
(use n_14912521e87a6d387157d526b281bde8422371d1.election)
(expect
"Add Candidate A"
"Write succeeded"
(add-candidate { "key": "1", "name": "Candidate A" })
)
(expect
"Add Candidate B"
"Write succeeded"
(add-candidate { "key": "2", "name": "Candidate B" })
)
(expect
"Add Candidate C"
"Write succeeded"
(add-candidate { "key": "3", "name": "Candidate C" })
)
(commit-tx)Notice that each candidate object has the fields
keyandname, while thecandidate-schemayou defined for thecandidatestable has columns fornameandvotes. Because theadd-candidatefunction sets thevotescolumn to have an initial value of0when a new candidate is added, you don't need to send a value for votes in the transaction.The
keyvalue is a unique index for the table row that is added. This value can't be automatically generated, so you have to pass a value yourself. -
Execute the code in the
election.replfile using the Pact command-line interpreter and the--tracecommand-line option.pact election.repl --traceYou should see that the transaction succeeds with output similar to the following:
...
election.repl:37:0-37:27:Trace: "Begin Tx 4 Add candidates"
election.repl:38:5-38:62:Trace: Loaded imports from n_d5ff15d933b83c1ef691dce3dabacfdfeaeade80.election
election.repl:39:5-43:6:Trace: "Expect: success Add Candidate A"
election.repl:44:5-48:6:Trace: "Expect: success Add Candidate B"
election.repl:49:5-53:6:Trace: "Expect: success Add Candidate C"
election.repl:54:0-54:11:Trace: "Commit Tx 4 Add candidates"
Load successful
You can add a transaction to call the
list-candidatesfunction after adding candidates to the database in theelection.replfile like this:(begin-tx "List candidates")
(use n_d5ff15d933b83c1ef691dce3dabacfdfeaeade80.election)
(list-candidates)
(commit-tx)Now that there's data in the table, the
list-candidatesfunction returns the rows from the table:...
election.repl:57:2-57:59:Trace: Loaded imports from n_d5ff15d933b83c1ef691dce3dabacfdfeaeade80.election
election.repl:58:4-58:21:Trace: [{"key": "1","name": "Candidate A","votes": 0} {"key": "2","name": "Candidate B","votes": 0} {"key": "3","name": "Candidate C","votes": 0}]
election.repl:59:0-59:11:Trace: "Commit Tx 5 List candidates"
Load successfulBecause the key for each row in a table must be unique, you should test that you can't insert a row with a duplicate key.
-
Add a transaction to the
election.replfile to test that you can't insert a row with a duplicate key:(begin-tx "Add candidate with existing key fails")
(use n_d5ff15d933b83c1ef691dce3dabacfdfeaeade80.election)
(expect-failure
"Database exception: Insert: row found for key 1"
(add-candidate { "key": "1", "name": "Candidate D" })
)
(commit-tx)If you were to execute this transaction, it would fail—as expected—with output similar to the following:
...
election.repl:61:0-61:50:Trace: "Begin Tx 6 Add candidate with existing key fails"
election.repl:62:0-62:57:Trace: Loaded imports from n_d5ff15d933b83c1ef691dce3dabacfdfeaeade80.election
election.repl:63:0-66:1:Trace: "Expect failure: Success: Database exception: Insert: row found for key 1"
election.repl:67:0-67:11:Trace: "Commit Tx 6 Add candidate with existing key fails"
Load successful -
Verify that you only have three candidates in the table by adding the following assertion to the
election-workshop/pact/election.replfile:(begin-tx "List candidates")
(use n_d5ff15d933b83c1ef691dce3dabacfdfeaeade80.election)
(expect
"There should be three candidates"
3
(length (list-candidates))
)
(commit-tx) -
Execute the code in the
election.replfile using the Pact command-line interpreter and the--tracecommand-line option.pact election.repl --traceYou should see that the transaction succeeds with output similar to the following:
...
election.repl:64:0:Trace: Begin Tx 6: List candidates
election.repl:65:2:Trace: Using n_d5ff15d933b83c1ef691dce3dabacfdfeaeade80.election
election.repl:66:2:Trace: Expect: success: There should be three candidates
election.repl:71:0:Trace: Commit Tx 6: List candidates
Load successful
You've now seen how candidates can be stored in a database table and that the
list-candidatesfunction works as expected to retrieve information from that table. The next step is to restrict access to theadd-candidatefunction, so that ony theelectionmodule owner can update thecandidatesdatabase.
Guard add-candidate with a capability
At this point, the add-candidate function is a public function that anyone can use to nominate candidates.
To prevent that kind of election chaos, you need a gatekeeper—a guard—that restricts access to the nominating process and the number of candidates or proposals to be voted on.
For the election application, this gatekeeper or guard is the holder of the election-admin administrative account.
To restrict access to the add-candidate function, you can define a new ELECTION-ADMIN capability.
With this capability, you can enforce that the election-admin must sign transactions that call specific functions. For the election module, you'll use the ELECTION-ADMIN capability to protect access to the add-candidate function.
To guard access to the add-candidate function:
-
Open the
election-workshop/pact/election.pactfile in your code editor. -
Define a new ELECTION-ADMIN capability that enforces the use of the
election-adminadministrative account.(defcap ELECTION-ADMIN ()
(enforce-guard (keyset-ref-guard "n_d5ff15d933b83c1ef691dce3dabacfdfeaeade80.election-admin"))) -
Update the
add-candidatefunction to check whether theELECTION-ADMINcapability is granted:(defun add-candidate (candidate:object)
(with-capability (ELECTION-ADMIN)
(insert candidates
(at "key" candidate)
{
"name": (at "name" candidate),
"votes": 0
}
)
)
)The
with-capabilityfunction ensures that theELECTION-ADMINcapability is in scope for the code block—the capability body—that inserts acandidateobject into thecandidatestable. If theELECTION-ADMINcapability can't be granted, because of a keyset failure in this case, the code block wrapped by thewith-capabilityfunction isn't executed.After making these changes in the
election.pactfile, you should add tests to verify the code works as you expect it to. -
Open the
election-workshop/pact/election.replfile in the code editor. -
Set the environment data and signature to use a different key, then add a transaction that you expect to fail for adding a fourth candidate.
(env-data
  { "admin-keyset" :
    { "keys" : [ "other-key" ]
    , "pred" : "keys-all"
    }
  }
)

(env-sigs
  [{ "key"  : "other-key"
   , "caps" : []
  }]
)

(begin-tx "Add candidate without permission fails")
  (use n_d5ff15d933b83c1ef691dce3dabacfdfeaeade80.election)
  (expect-failure
    "Adding a candidate with the wrong keyset should fail"
    "Keyset failure (keys-all)"
    (add-candidate { "key": "4", "name": "Candidate D" })
  )
(commit-tx) -
Execute the code in the
election.replfile using the Pact command-line interpreter and the--tracecommand-line option.pact election.repl --traceYou should see that the using the
add-candidatefunction is a guarded operation that fails when the wrong keyset is used with output similar to the following:...
election.repl:77:3-83:3:Trace: "Setting transaction data"
election.repl:85:2-89:3:Trace: "Setting transaction signatures/caps"
election.repl:91:2-91:53:Trace: "Begin Tx 8 Add candidate without permission fails"
election.repl:92:4-92:61:Trace: Loaded imports from n_d5ff15d933b83c1ef691dce3dabacfdfeaeade80.election
election.repl:93:4-97:5:Trace: "Expect failure: Success: Adding a candidate with the wrong keyset should fail"
election.repl:98:2-98:13:Trace: "Commit Tx 8 Add candidate without permission fails"
Load successful -
Clear the environment data and signature and add another transaction to try to call the
add-candidatefunction.(env-data {})
(env-sigs [])
(begin-tx "Add candidate without permission fails")
(use n_d5ff15d933b83c1ef691dce3dabacfdfeaeade80.election)
(add-candidate { "key": "4", "name": "Candidate D" })
(commit-tx) -
Execute the code in the
election.replfile using the Pact command-line interpreter and the--tracecommand-line option.pact election.repl --traceYou should see that calling the
add-candidatefunction fails with output similar to the following:...
election.repl:103:2-103:59:Trace: Loaded imports from n_d5ff15d933b83c1ef691dce3dabacfdfeaeade80.election
election.pact:11:5: Keyset failure (keys-all): [d0aa3280...]
11 | (enforce-guard (keyset-ref-guard "n_d5ff15d933b83c1ef691dce3dabacfdfeaeade80.election-admin")))
| ^^^^^^^^^^^^^^^^^^^^^^^^^^^^^^^^^^^^^^^^^^^^^^^^^^^^^^^^^^^^^^^^^^^^^^^^^^^^^^^^^^^^^^^^^^^^^^
at(n_d5ff15d933b83c1ef691dce3dabacfdfeaeade80.election.ELECTION-ADMIN.{Cp4zNjFLxwm66mq6BWMpo4z1seYIjWyOfsPXXUNkcxE}):election-07-wip.pact:26:5-34:6
at(n_d5ff15d933b83c1ef691dce3dabacfdfeaeade80.election.add-candidate.{Cp4zNjFLxwm66mq6BWMpo4z1seYIjWyOfsPXXUNkcxE} {"key": "4","...}):election.repl:104:2-104:55 -
Remove the changes to the environment data and signatures and the last two transactions, then execute the code in the
election.replfile to verify that the file loads successfully using theelection-adminkeyset guard.
Deploy the election module
Now that you've updated and tested your election module using the Pact REPL, you can update the module deployed on the local development network.
To update the election module on the development network:
-
Verify the development network is currently running on your local computer.
-
Open the
election-module-devnet.ktplfile, add the"init-candidates": trueproperty to the transaction data, and save the file.data:
election-admin:
keys: ["{{public-key}}"]
pred: "keys-all"
"init-candidates": true -
Create a transaction that uses the
election-module-devnet.ktpltemplate by running thekadena tx addcommand and following the prompts displayed. -
Sign the transaction by running the
kadena tx signcommand and following the prompts displayed. -
Send the signed transaction to the blockchain by running the
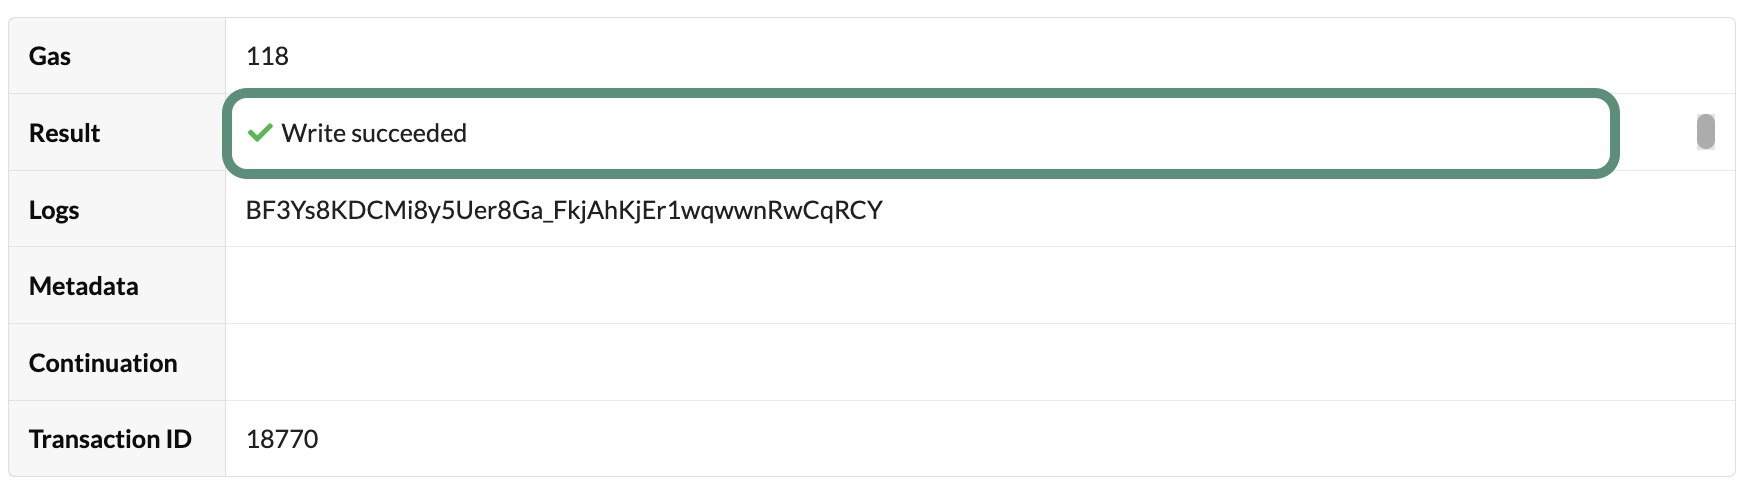
kadena tx sendcommand and following the prompts displayed.You can verify the transaction results using the request key for the transaction.
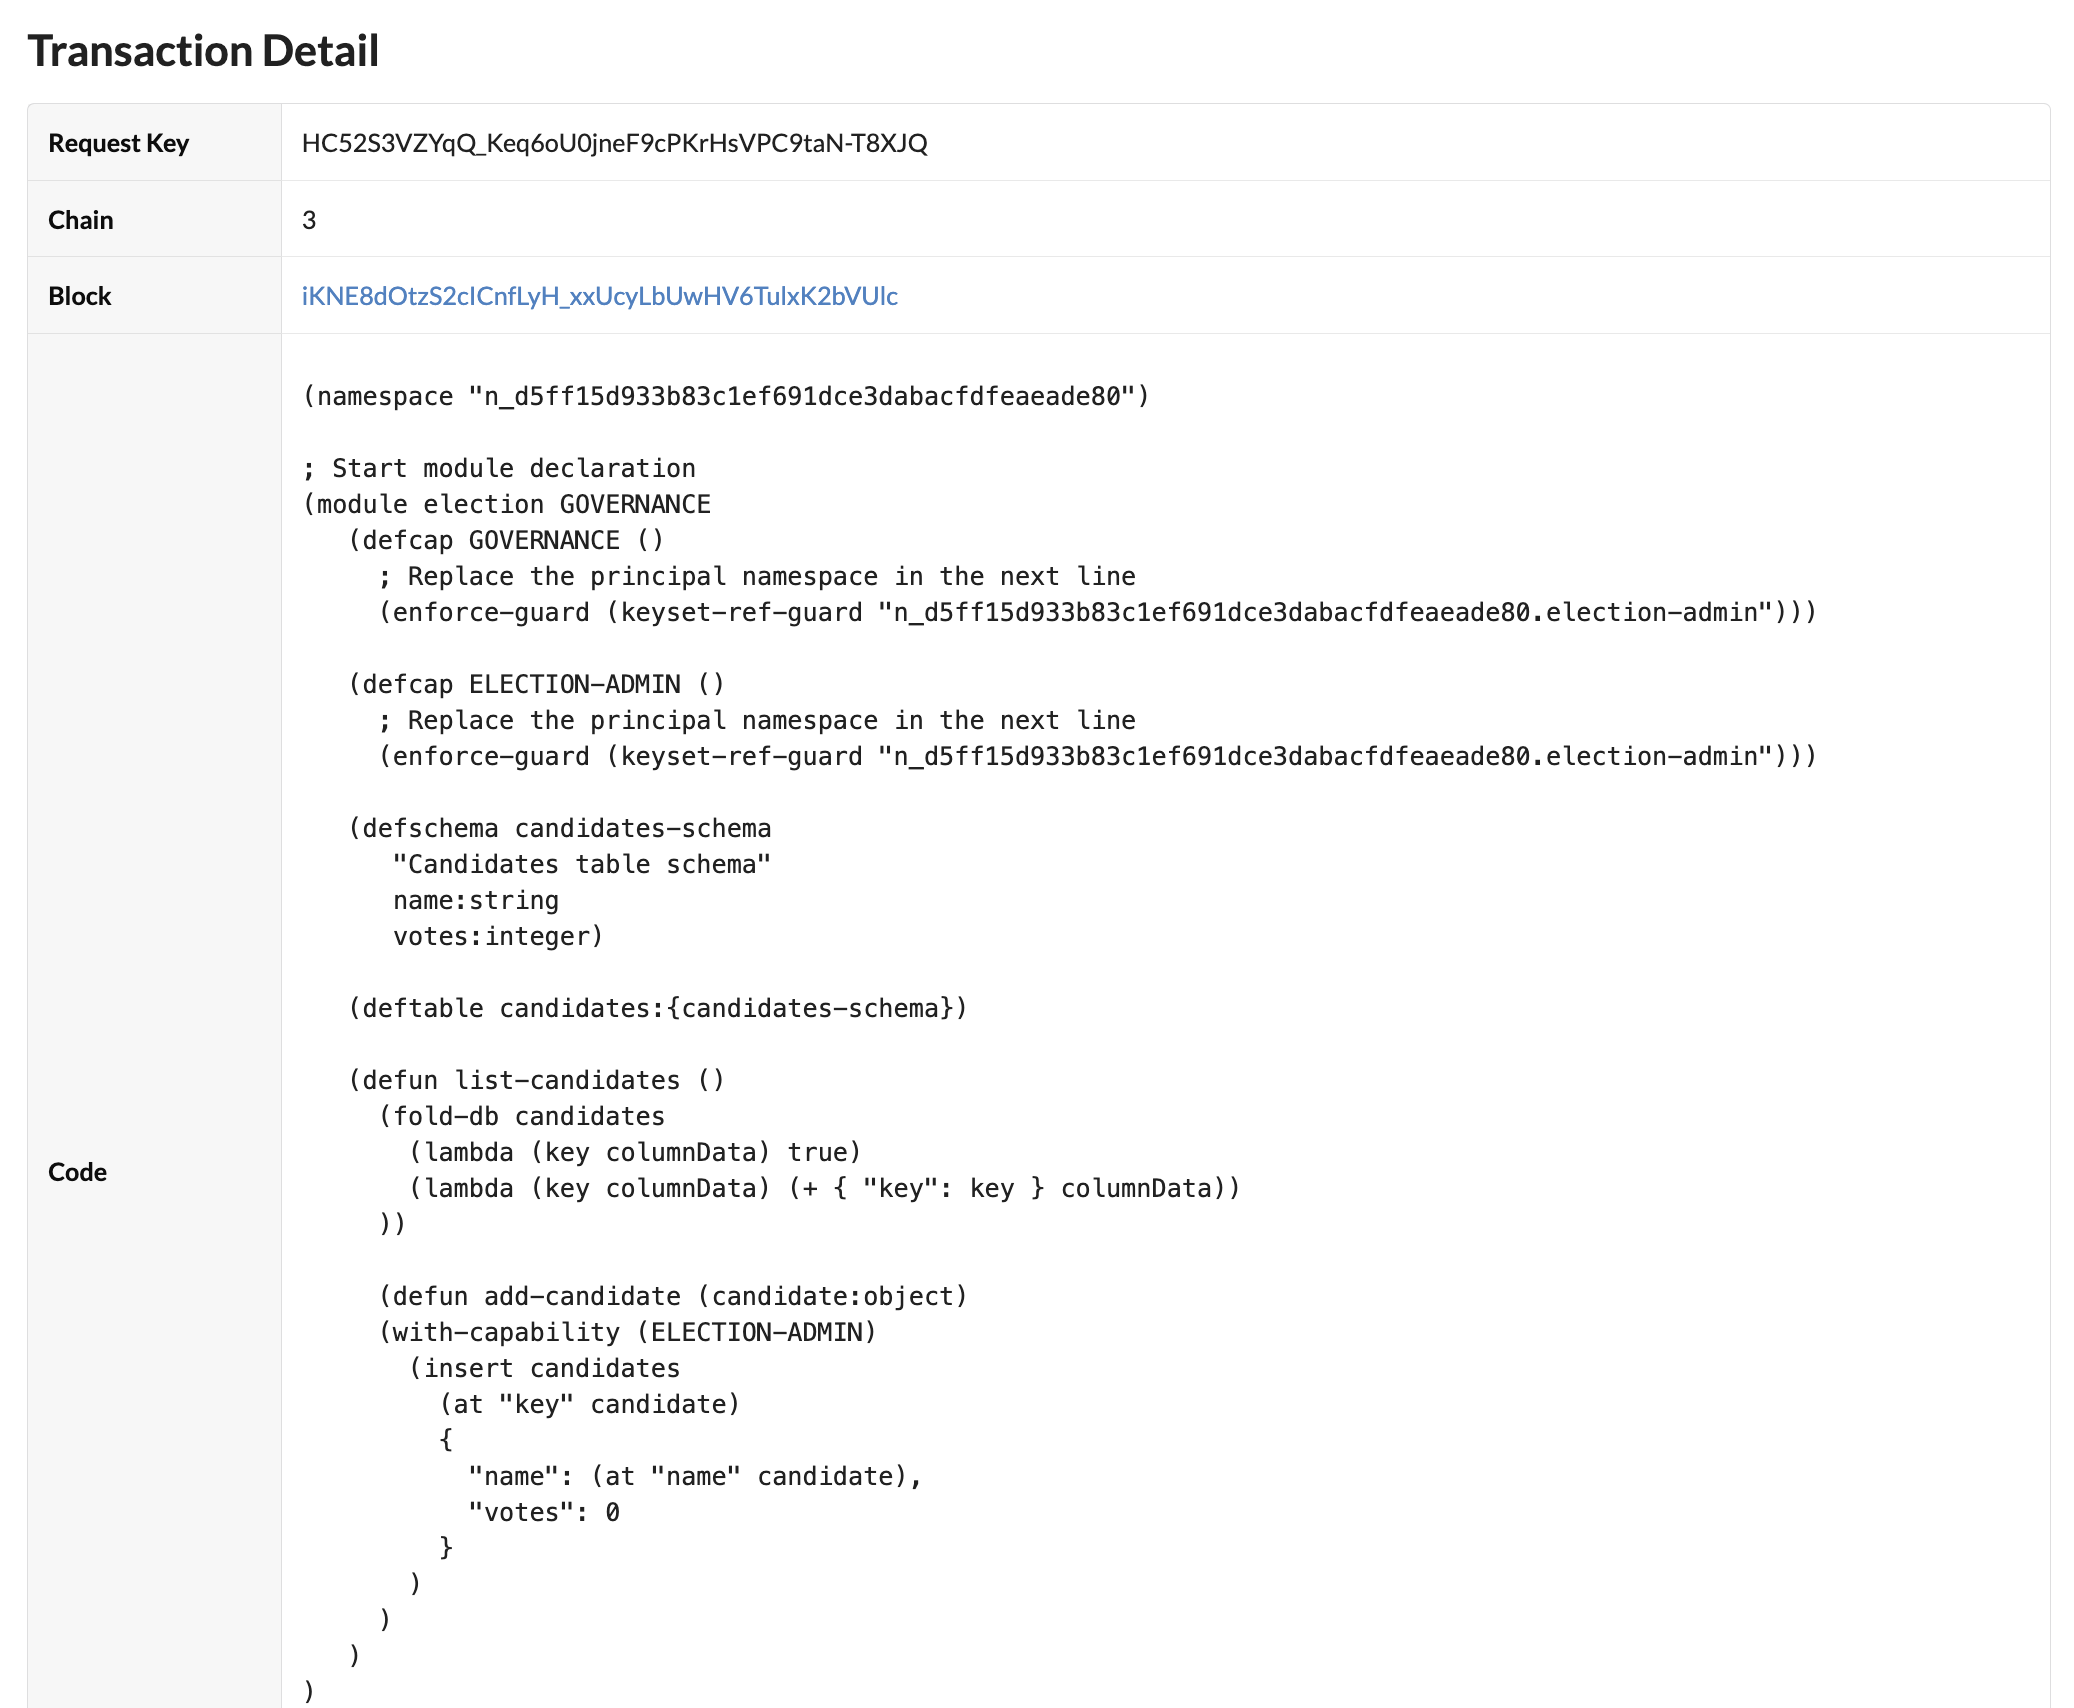
Add a candidate
After you deploy the module on the local development network, you can use your administrative account to add, sign, and send transactions that add candidates to the candidates table.
To add a candidate to the election module you have deployed on the development network:
-
Create a new reusable transaction template named
add-election-candidate.ktplin the~/.kadena/transaction-templatesfolder. -
Open the
add-election-candidate.ktplfile and create a YAML transaction request similar to the following.code: |-
(n_d5ff15d933b83c1ef691dce3dabacfdfeaeade80.election.add-candidate { "key": "1", "name": "Maya Garcia" })
data:
election-admin:
keys: ["{{public-key}}"]
pred: "keys-all"
meta:
chainId: "{{chain-id}}"
sender: "{{{sender-account}}}"
gasLimit: 80300
gasPrice: 0.000001
ttl: 600
signers:
- public: "{{public-key}}"
caps: []
networkId: "{{network-id}}" -
Create a transaction that uses the
add-election-candidate.ktpltemplate by running thekadena tx addcommand and following the prompts displayed. -
Sign the transaction by running the
kadena tx signcommand and following the prompts displayed. -
Send the signed transaction to the blockchain by running the
kadena tx sendcommand and following the prompts displayed.You can verify the transaction results using the request key for the transaction.
You can reuse the
add-election-candidate.ktpltemplate to add more candidates to the candidates table by updating the code to specify a new index key and candidate name or proposal title. For example:code: |-
(n_d5ff15d933b83c1ef691dce3dabacfdfeaeade80.election.add-candidate { "key": "2", "name": "Tai Xi" })You could also use this template to add proposals instead of the candidates to election by providing a new unique index key and a proposal title. For example:
code: |-
(n_d5ff15d933b83c1ef691dce3dabacfdfeaeade80.election.add-candidate  { "key": "2a", "name": "Approve the budget for the new library." })
Connect the frontend
You now have the election backend defined in a Pact module running on the development network. To make the functions in the module available to the election application website, you need to modify the frontend to exchange data with the development network.
The frontend, written in TypeScript, uses repositories to exchange data with the backend.
The interfaces for these repositories are defined in the frontend/src/types.ts file.
By default, the frontend uses the in-memory implementations of the repositories.
By making changes to the implementation of the interface ICandidateRepository in frontend/src/repositories/candidate/DevnetCandidateRepository.ts, you can configure the frontend to use the devnet backend instead of the in-memory backend.
After making these changes, you can use the frontend to view candidates from the candidates table that are managed by your election module running on the development network blockchain.
To modify the frontend to list candidates from the development network:
-
Open
election-workshop/frontend/src/repositories/candidate/DevnetCandidateRepository.tsin your code editor. -
Update the values for the
CHAIN_IDandNAMESPACEconstants with the chain where you deployed theelectionmodule and your own principal namespace.const NETWORK_ID = 'development';
const CHAIN_ID = '3';
const API_HOST = `http://localhost:8080/chainweb/0.0/${NETWORK_ID}/chain/${CHAIN_ID}/pact`;
const NAMESPACE = 'n_d5ff15d933b83c1ef691dce3dabacfdfeaeade80'; -
Remove the
@ts-ignorecomment from thelistCandidatesfunction:const listCandidates = async (): Promise<ICandidate[]> => {
const transaction = Pact.builder
// @ts-ignore
.execution(Pact.modules[`${NAMESPACE}.election`]['list-candidates']())
.setMeta({
chainId: CHAIN_ID,
gasLimit: 100000,
})
.setNetworkId(NETWORK_ID)
.createTransaction();
const { result } = await client.dirtyRead(transaction);
return result.status === 'success'
? (result.data.valueOf() as ICandidate[])
: [];
};This function uses the Kadena client (
@kadena/client) library to connect to the development network and read data from the blockchain. After you remove the@ts-ignorecomment, you should notice that the code editor highlights a problem with your module because it isn't defined in theIPactModulesinterface. To fix this problem, you must generate types for theelectionmodule so they can be used when called by Kadena client library functions. -
Open a terminal in your code editor, change to the
election-workshop/frontenddirectory, then generate types for theelectionmodule by running the following command:npm run pactjs:generate:contract:electionThis command uses the
pactjslibrary to generate TypeScript definitions for theelectionmodule and should clear the error reported by the code editor. Depending on the code editor, you might need to close the project in the editor and reopen it to reload the code editor window with the change.After you clear the error, note that the
listCandidatesfunction:- Sets the chain identifier, gas limit, and network identifier before creating the transaction.
- Creates a
clientconnection to the blockchain. - Uses the
dirtyReadmethod from the@kadena/clientlibrary to return a raw response for the transaction result without sending a transaction to the blockchain. - Processes the response from the development network and returns a list of candidates or an empty list.
-
In the terminal where the
election-workshop/frontenddirectory is your current working directory, install the frontend dependencies by running the following command:npm install -
Start the frontend application configured to use the
devnetbackend by running the following command:npm run start-devnet -
Open
http://localhost:5173in your browser and verify that the website loads without errors.You'll notice that—unlike the frontend configured to use the in-memory backend—only the candidate you added after deploying the module on the development network is displayed. With the development network backend, candidates must be added to the
candidatestable before they can be displayed.
Next steps�
In this tutorial, you learned how to:
- Define a simple database schema and database table to store candidates.
- Define functions for listing and adding candidates to the
candidatestable. - Deploy the
electionmodule on the development network running locally. - Connect the frontend of the election website to use the
electionmodule deployed on the development network as a backend.
In the next tutorial, you'll upgrade the election module to enable people to cast a vote on a candidate with their Kadena account.
To see the code for the activity you completed in this tutorial and get the starter code for the next tutorial, check out the 08-voting branch from the election-workshop repository by running the following command in your terminal
shell:
git checkout 08-voting