Pact built-in server
The Pact built-in server coding project demonstrates how to use the Pact built-in REST API endpoints for testing transactions on a local server. This coding project focuses on how to:
- Create a YAML configuration file for the Pact built-in local server.
- Create YAML execution API requests to submit transactions.
- Format YAML execution requests as JSON objects.
- Submit YAML requests using the Pact REST API endpoints.
By becoming familiar with how to perform these tasks, you'll be better prepared to develop a full stack application that combines a Pact smart contract backend with a Javascript-based frontend.
Before you begin
Before starting this project, verify your environment meets the following basic requirements:
- You have a GitHub account and can run
gitcommands. - You have installed the Pact programming language and command-line interpreter.
- You have installed the
kadena-clipackage and have a working directory with initial configuration settings. - You have a local development node that you can connect to that runs the
chainweb-nodeprogram, either in a Docker container or on a physical or virtual computer. - You should be familiar with defining modules and using keysets.
Create a local working environment
For this coding project, there's no starter code. Instead, you'll create a local working environment that includes the following:
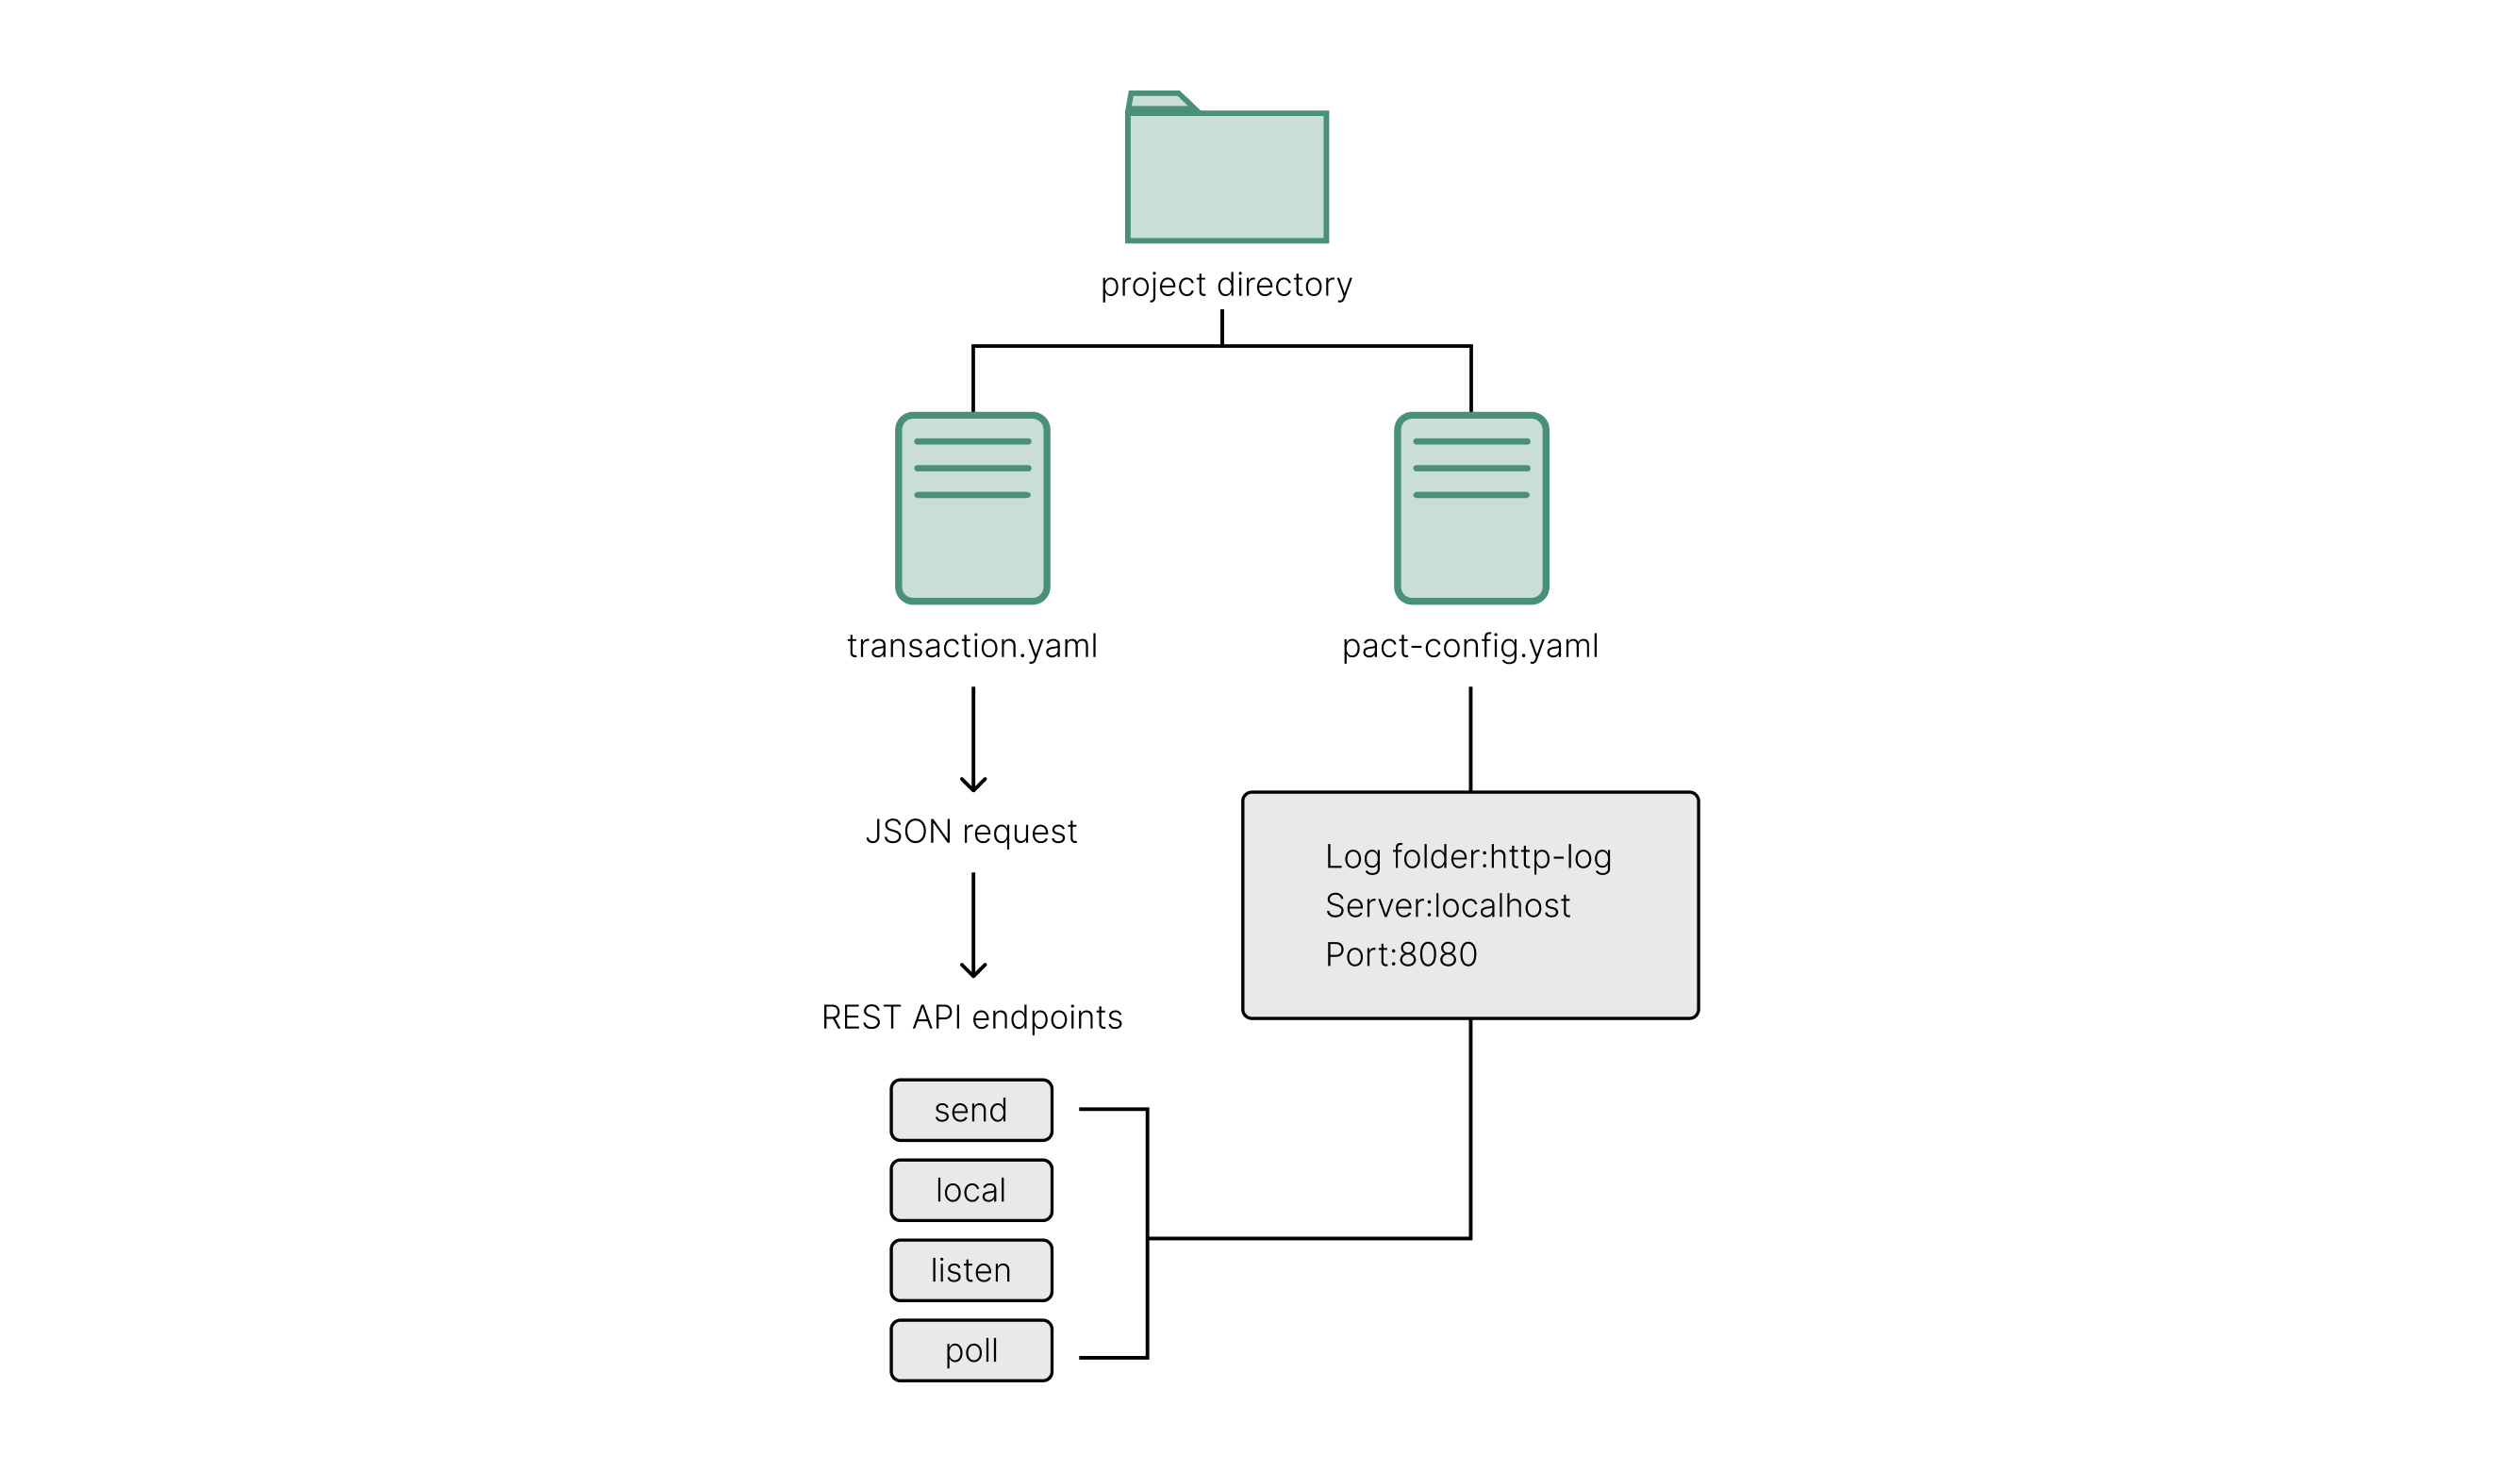
- A local project directory.
- A local server configuration file.
- A sample transaction execution request using the YAML API request format.
- A directory for storing log files.
Create a project folder
To create a project folder:
-
Open a terminal shell on your computer.
-
Create a new directory named
local-projectto hold the project files.mkdir deploy-tutorial -
Change the directory to make the
local-projectfolder your current working directory:cd local-project
Create a configuration file
To create a server configuration file:
-
Create a new
pact-config.yamlfile for the local server configuration settings:touch pact-config.yaml -
Open the
pact-config.yamlfile in your code editor and define the following configuration settings:# Configuration file for the Pact built-in HTTP server.
# HTTP server port
port: 8080
# directory for HTTP logs
logDir: http-log
# persistence directory
persistDir: http-log
# SQLite pragmas for pact back-end
pragmas: []
# verbose: provide log output
verbose: TrueYou can also find the standard format for the Pact server configuration file in the Pact repository. The file provides the following fields to configure settings for the Pact built-in server:
Use this field To do this portSpecify the port number for the local Pact HTTP server to use. In this example, the port number 8080is specified and is used as the port in all of the examples in this project. You can change this setting if you want to use a different. If this port is available in your local environment, you can leave this setting as it is.logDirSpecify the directory for HTTP logs should be stored. This setting specifies a folder location relative to the current directory. persistDirSpecify the directory for persistence data to be stored. This setting specifies a folder location relative to the current directory. pragmasSpecify the SQLite pragmas commands to control environmental variables or state flags within the Pact SQLite database. verboseSpecify whether you want the Pact server to log output. You can set this field to trueto produce log files or false if don't want to produce log files. -
Save your changes and close the
pact-config.yamlconfiguration file.
Create a sample transaction file
To create a sample transaction file:
-
Create a new
transaction.yamlfile for the local server configuration settings:touch transaction.yaml -
Open the
transaction.yamlfile in your code editor and define a sample execution request using the YAML API request format:code: "(+ 1 2)"
data:
name: Stuart
language: Pact
keyPairs:
- public: ba54b224d1924dd98403f5c751abdd10de6cd81b0121800bf7bdbdcfaec7388d
secret: 8693e641ae2bbe9ea802c736f42027b03f86afe63cae315e7169c9c496c17332In this example, the transaction includes one line of Pact code
1 + 2, two data fields for the nameStuartand the languagePact, and a public and secret key pair that was generate by running thepact --genkeycommand. Transaction requests must always include either thecodesetting to specify the Pact code to execute or thecodeFilesetting to specify the path to a file that contains the Pact code to execute. Thedatasetting is most commonly uses to specify keyset information. For example:codeFile: "deploy-hello.pact"
data:
sample-keyset: {
keys: ["58705e8699678bd15bbda2cf40fa236694895db614aafc82cf1c06c014ca963c"],
pred: "keys-all"
}Alternatively, you can use a
dataFilesetting to specify the path to a file that contains the data for the transaction.The
keyPairssetting lists key pairs to use for signing transaction. The key pairs are expected to be generated using the Ed25519 signature scheme that produces a base-16 public key and base-16 secret key.For more information about formatting API requests in YAML, see Transaction formats.
-
Save your changes and close the
transaction.yamlfile.
Create a directory for logging
To create a directory for logging:
-
Open a terminal shell on your computer and navigate to the
local-projectfolder, if necessary. -
Create a new directory named
http-logto hold the log files.mkdir http-log -
Check the contents of the directory to verify you have the log directory and YAML files.
ls -lThe command should display output similar to the following:
total 16
drwxr-xr-x  2 pistolas  staff   64 Jan  6 15:33 http-log
-rw-r--r--  1 pistolas  staff  279 Jan  6 15:33 pact-config.yaml
-rw-r--r--  1 pistolas  staff  218 Jan  6 15:31 transaction.yaml
Start the local server
Now that you have a working environment, you are ready to start the Pact server and use the local Pact REST API endpoints to test transactions.
To start the local server:
-
Open a terminal shell on your computer and navigate to the
local-projectfolder, if necessary. -
Start the local server using the settings you defined in the pact-config.yaml file.
pact --serve pact-config.yamlAfter running this command, you should see the Pact server initialized and running on port 8080 with output similar to the following:
2025/01/06-15:44:02 [history] Persistence Enabled: http-log/commands.sqlite
2025/01/06-15:44:02 [PactService] INIT Initializing pact SQLLite
2025/01/06-15:44:02 [api] starting on port 8080
2025/01/06-15:44:02 [PactService] INIT Creating Pact Schema
2025/01/06-15:44:02 [PactPersist] DDL createTable: TableId "SYS_usertables"
2025/01/06-15:44:02 [Persist-SQLite] DDL createTable: DataTable (TableId "SYS_usertables")
2025/01/06-15:44:02 [Persist-SQLite] DDL createTable: TxTable (TableId "SYS_usertables")
2025/01/06-15:44:02 [PactPersist] DDL createTable: TableId "SYS_keysets"
2025/01/06-15:44:02 [Persist-SQLite] DDL createTable: DataTable (TableId "SYS_keysets")
2025/01/06-15:44:02 [Persist-SQLite] DDL createTable: TxTable (TableId "SYS_keysets")
2025/01/06-15:44:02 [PactPersist] DDL createTable: TableId "SYS_modules"
2025/01/06-15:44:02 [Persist-SQLite] DDL createTable: DataTable (TableId "SYS_modules")
2025/01/06-15:44:02 [Persist-SQLite] DDL createTable: TxTable (TableId "SYS_modules")
2025/01/06-15:44:02 [PactPersist] DDL createTable: TableId "SYS_namespaces"
2025/01/06-15:44:02 [Persist-SQLite] DDL createTable: DataTable (TableId "SYS_namespaces")
2025/01/06-15:44:02 [Persist-SQLite] DDL createTable: TxTable (TableId "SYS_namespaces")
2025/01/06-15:44:02 [PactPersist] DDL createTable: TableId "SYS_pacts"
2025/01/06-15:44:02 [Persist-SQLite] DDL createTable: DataTable (TableId "SYS_pacts")
2025/01/06-15:44:02 [Persist-SQLite] DDL createTable: TxTable (TableId "SYS_pacts")
2025/01/06-15:44:02 [disk replay]: No replay found
You can now call Pact REST API endpoints using the local server.
Call REST API endpoints
You can use the local Pact server to call the following Pact REST API endpoints:
| Use this endpoint | To do this |
|---|---|
/send | Submit a transaction that contains a cmd object in JSON format and return a transaction hash. This transaction hash is the same string as the request key you can use to look up transaction results. |
/listen | Specify a single transaction hash and return the transaction result. |
/poll | Specify multiple transaction hashes in a single request and return multiple transaction results. |
/local | Submit a transaction that contains a cmd object that queries the blockchain but only runs in the local server and return the transaction result. |
Send
Now that the Pact server is running, you can use the terminal to call the /send endpoint locally.
To call the /send endpoint, you must:
- Convert the YAML request in the transaction.yaml file into a JSON
cmdobject. - Include the
cmdobject in the request body in the API request.
To call the /send endpoint:
-
Open a new terminal shell on your computer.
-
Navigate to the
local-projectfolder. -
Convert the YAML request in the transaction.yaml file into a JSON cmd object.
pact --apireq transaction.yamlThis command formats the sample transaction file and displays the JSON output similar to the following in the terminal:
{"cmds":[{"hash":"KVe1Kw3IvlS_hkf95Hsa2yjC0AQCXGlI2ZVXVcUfT88","sigs":[{"sig":"7c35dad8a8990642bfe7331cd2553ca1a27828bc29b29257ece286ac0a52c3958da24102496d708d479c544136d1553f954e962239c0f48d5eebe87131360e0e"}],"cmd":"{\"networkId\":null,\"payload\":{\"exec\":{\"data\":{\"name\":\"Stuart\",\"language\":\"Pact\"},\"code\":\"(+ 1 2)\"}},\"signers\":[{\"pubKey\":\"ba54b224d1924dd98403f5c751abdd10de6cd81b0121800bf7bdbdcfaec7388d\"}],\"meta\":{\"creationTime\":0,\"ttl\":0,\"gasLimit\":0,\"chainId\":\"\",\"gasPrice\":0,\"sender\":\"\"},\"nonce\":\"2025-01-07 00:10:12.876201 UTC\"}"}]} -
Call the
/sendendpoint using acurlcommand similar to the following:pact --apireq transaction.yaml | curl -H "Content-Type: application/json" -d @- http://localhost:8080/api/v1/sendThis command formats that YAML transaction, specifies the request header for the
Content-Typeto beapplication/json, then specifies the destination for the API call. In this case, the API call is sent to thelocalhoston port8080.This command returns the request key for the transaction in the response:
{"requestKeys":["Mvn7OBApUVCck9lPzvNJjwd2gBeq6ZFEJnXTI-R0hQQ"]}Each request generates a unique transaction hash, so your request key will be different from the example.
Listen
You can use the /listen endpoint to request the transaction result for a single transaction hash.
The format for calling the /listen endpoint looks similar to the following:
curl -H "Content-Type: application/json" -d '{"listen":"Mvn7OBApUVCck9lPzvNJjwd2gBeq6ZFEJnXTI-R0hQQ"}' -X POST http://localhost:8080/api/v1/listen
This command returns the result of the request with output similar to the following:
{"gas":0,"result":{"status":"success","data":3},"reqKey":"Mvn7OBApUVCck9lPzvNJjwd2gBeq6ZFEJnXTI-R0hQQ","logs":"wsATyGqckuIvlm89hhd2j4t6RMkCrcwJe_oeCYr7Th8","metaData":null,"continuation":null,"txId":1}
Poll
You can use the /poll endpoint to request the transaction results for multiple transactions with a single call.
The /poll endpoint is similar to the /listen endpoint except that the connection is intended to run at an interval instead of remain open and accepts multiple request key hashes in the request and returns multiple transaction results.
The format for calling the /poll endpoint looks similar to the following with a list of the request keys you received in response from calling the /send endpoint:
curl -H "Content-Type: application/json" -d '{"requestKeys":["Mvn7OBApUVCck9lPzvNJjwd2gBeq6ZFEJnXTI-R0hQQ", "5Fu1m0crUk7MKL0Yyjg3gMPGcKuC0U4dx5Z5kBEQUz8",
"18_CToCa_JXDvOPIHF-CceDw9gCpEMbpJKgLmot7I9M", "pdjiSC6IN_enbolWiuLVynXYVv1os8E9YfptltXjckU"]}' -X POST http://localhost:8080/api/v1/poll
This command returns the result of the request with output similar to the following:
{"5Fu1m0crUk7MKL0Yyjg3gMPGcKuC0U4dx5Z5kBEQUz8":{"gas":0,"result":{"status":"success","data":3},"reqKey":"5Fu1m0crUk7MKL0Yyjg3gMPGcKuC0U4dx5Z5kBEQUz8","logs":"wsATyGqckuIvlm89hhd2j4t6RMkCrcwJe_oeCYr7Th8","metaData":null,"continuation":null,"txId":1}}
The difference between the /listen and /poll endpoints is subtle, but important.
You only use the /listen endpoint if you are working with a single hash to return the result.
You use the /poll endpoint if you want to request the results for multiple transactions.
Local
You can use the /local endpoint to submit queries to the blockchain without affecting the blockchain state.
The /local endpoint is similar to the /send endpoint in that it includes a cmd object with code in the request and returns the transaction result.
However, the transaction you submit using the /local endpoint only runs in local server and does not update any nodes in the blockchain network.
The format for calling the /local endpoint looks similar to the following:
pact --apireq transaction.yaml --local | curl -H "Content-Type: application/json" -d @- http://localhost:8080/api/v1/local
This command returns output that's similar to the output from the /send endpoint:
{"gas":0,"result":{"status":"success","data":3},"reqKey":"ch8h1qrsqpOtt9mIhwi1vGXM8QKc53OIGEpKUF3Yz80","logs":"wsATyGqckuIvlm89hhd2j4t6RMkCrcwJe_oeCYr7Th8","metaData":null,"continuation":null,"txId":null}
The /local endpoint is particularly useful if you want to execute a function that doesn’t need to change the state of the blockchain.
In general, you should use the /local endpoint if you want to call functions that retrieve information from tha blockchain.
Yoi should use the /send endpoint if you want to update information stored in the blockchain or to deploy smart contracts on the blockchain.
Write and execute YAML requests
At this point, you have learned how to start a local Pact server and how to use the REST API endpoints to update or retrieve information from the blockchain. The next step is to apply what you've learned to write your own YAML request files, convert the requests to JSON, and execute the transactions using the REST API endpoints. To finish this coding project, write and execute YAML request files for the following transactions:
- Deploy the
helloWorldcontract. - Call the
say-hellofunction.
For this exercise, add the following smart contract to create a hello-world.pact file in your local-project folder:
(module helloWorld GOVERNANCE
    "You can also embed comments in smart contracts by using quoted strings."

    (defcap GOVERNANCE () true)
      (defun say-hello(name:string)
        (format "Hello, {}! ~ from Kadena" [name])
    )
)
If you list the contents of the local-project folder, you should see the following files and folder:
total 24
-rw-r--r--  1 pistolas  staff  236 Jan  7 10:11 hello-world.pact
drwxr-xr-x  4 pistolas  staff  128 Jan  6 16:19 http-log
-rw-r--r--  1 pistolas  staff  279 Jan  6 15:33 pact-config.yaml
-rw-r--r--  1 pistolas  staff  218 Jan  6 15:31 transaction.yaml
To write and execute YAML requests:
-
Generate a public and secret key pair to sign transactions using a command similar to the following:
pact --genkey > pistolas.keysThis command create a
pistolas.keysfile with a public and secret key. For example:public: 6392582fe63bd6bb28d55f02e8ec75d0a668ba7b1065076ca1a630f470009f68
secret: 06fe72b8deaf96ba21734535bfb8c7e062d64b672b1c7d5179d67b7d363a3b13Note that, in this example, you’re submitting requests to the built-in Pact server endpoints. If you were deploying contracts or calling functions on the Kadena development, test, or production network, your YAML request file would need to include additional information such as the network identifier and chain identifier. You can find examples of more complete YAML request files in the How to guides.
-
Write a minimal
deploy-hello-world.yamlfile that deploys thehello-world.pactfile.# Deploy ‘Hello, world! smart contract’
codeFile: hello-world.pact
data:
keyPairs:
- public: 6392582fe63bd6bb28d55f02e8ec75d0a668ba7b1065076ca1a630f470009f68
secret: 06fe72b8deaf96ba21734535bfb8c7e062d64b672b1c7d5179d67b7d363a3b13 -
Deploy the contract by calling the
/sendendpoint.pact --apireq deploy-hello-world.yaml | curl -H "Content-Type: application/json" -d @- http://localhost:8080/api/v1/sendThe command returns the request key. For example:
{"requestKeys":["7tq7i9cqTdTOA4GDoBkMDtq8aXFD3xXei_R85NWsQdA"]} -
Listen for the transaction result by calling the
/listenendpoint.curl -H "Content-Type: application/json" -d '{"listen":"7tq7i9cqTdTOA4GDoBkMDtq8aXFD3xXei_R85NWsQdA"}' -X POST http://localhost:8080/api/v1/listenThe command returns the transaction result. For example:
{"gas":0,"result":{"status":"success","data":"Loaded module helloWorld, hash JzE-eJ5v2GdSBbcrv5eHUN0zBARx31RpiQfAXKmLD_s"},"reqKey":"7tq7i9cqTdTOA4GDoBkMDtq8aXFD3xXei_R85NWsQdA","logs":"_PWOYLBV0TVmcdaTl3FnwEeYFETdE6Cs6pvB9I4kZGA","metaData":null,"continuation":null,"txId":1} -
Write a
call-say-hello.yamlfile that calls thesay-hellofunction.# Call the say-hello-function
code: (helloWorld.say-hello "San Francisco, CA")
data:
keyPairs:
- public: 6392582fe63bd6bb28d55f02e8ec75d0a668ba7b1065076ca1a630f470009f68
secret: 06fe72b8deaf96ba21734535bfb8c7e062d64b672b1c7d5179d67b7d363a3b13 -
Submit a transaction that calls the function by using the
/sendendpoint.pact --apireq call-say-hello.yaml | curl -H "Content-Type: application/json" -d @- http://localhost:8080/api/v1/sendThe command returns the request key. For example:
{"requestKeys":["5HW7PI3eqrKt4zKVTk5HdFVO0_GGmtQJr7AJwZ_xOto"]} -
Listen for the transaction result by calling the
/listenendpoint with the request key returned.curl -H "Content-Type: application/json" -d '{"listen":"5HW7PI3eqrKt4zKVTk5HdFVO0_GGmtQJr7AJwZ_xOto"}' -X POST http://localhost:8080/api/v1/listenThe command returns the transaction result. For example:
{"gas":0,"result":{"status":"success","data":"Hello, San Francisco, CA! ~ from Kadena"},"reqKey":"5HW7PI3eqrKt4zKVTk5HdFVO0_GGmtQJr7AJwZ_xOto","logs":"wsATyGqckuIvlm89hhd2j4t6RMkCrcwJe_oeCYr7Th8","metaData":null,"continuation":null,"txId":4}
Review
In this coding project, you created a project directory with a local server configuration file and a sample transaction YAML request file.
You also created a http-log folder for SQLite data from the Pact server and started the Pact server locally on port number 8080.
After starting the server, you used the pact --apireq command to convert the sample YAML request file into a JSON cmd object and used curl commands to send the cmd object to the Pact server.
Now that you know how to write and submit transaction requests and how to look up transaction results and submit local queries, you can begin developing more sophisticated applications to run on the Kadena blockchain.