Rotate authorized keys
The Rotate authorized keys coding project demonstrates how to create a smart contract with rotatable authorization keys and how to enforce row level permissions. This project continues to build on concepts and challenges presented in other coding projects and covered in Smart contracts topics. Specifically, this project demonstrates the following:
- How you can use keysets as row level guards for assets.
- How to allow users to update information in tables based on their keyset.
- How to change ownership by rotating keyset values to authorize a new owner.
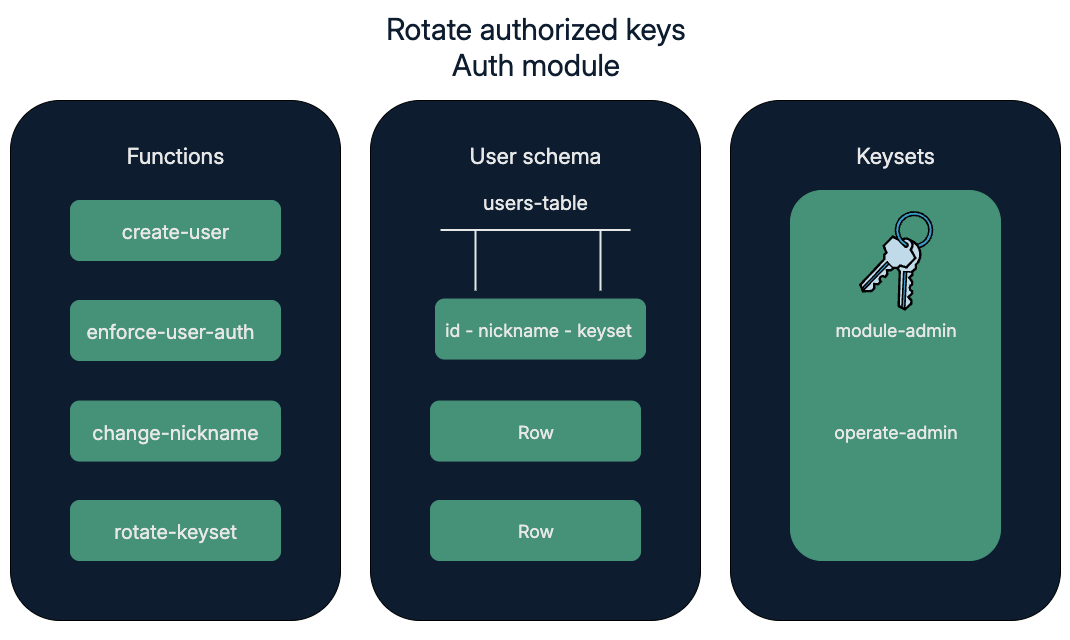
To implement these features, you'll create an auth module with four functions, one table, and two keysets:
Before you begin
Before starting this project, verify your environment meets the following basic requirements:
- You have a GitHub account and can run
gitcommands. - You have installed the Pact programming language and command-line interpreter.
- You have installed the
kadena-clipackage and have a working directory with initial configuration settings. - You have a local development node that you can connect to that runs the
chainweb-nodeprogram, either in a Docker container or on a physical or virtual computer. - You must have at least one account that's funded with KDA on at least one chain for deployment on the local development network or the Kadena test network.
- You should be familiar with the basics for defining modules and using keysets.
Get the starter code
To get started:
-
Open a terminal shell on your computer.
-
Clone the
pact-coding-projectsrepository by running the following command:git clone https://github.com/kadena-docs/pact-coding-projects.git -
Change to the
02-rotate-authdirectory by running the following command:cd pact-coding-projects/02-rotate-authIf you list the contents of this directory, you'll see the following files:
starter-auth.pactprovides a starting point with the framework for the project code and comments for every challenge.auth.pactcontains the final solution code that can be deployed.auth.replprovides a complete test file for testing the finalauth.pactcontract.
-
Open and review the
starter-auth.pactfile.This file describes all of the tasks that you need to complete for the Rotate authorized keys coding project. You can follow the instructions embedded in the file to try to tackle this coding project on your own without looking at the solutions to each step, or follow the instructions in the next sections if you need additional guidance.
Define a namespace, keyset, and module
As you might have seen in other coding projects, modules are defined in a namespace and are governed by either an administrative keyset or a governance capability.
To simplify the initial code required, this coding project assumes you are defining a custom dev namespace for local development.
As an alternative, you could use the free namespace.
The free namespace is a publicly-available namespace that you can use to deploy smart contracts on the Kadena test network.
However, the best practice is to create a unique principal namespace where you can deploy all of your modules.
Creating a principal namespace is covered later.
Like namespaces, keysets are defined outside of module code and passed into the module from message data that you provide separate from module code.
This coding project requires two keysets:
- The module-admin keyset allows authorized users to define and update modules.
- The operate-admin keyset allows authorized users to create user accounts.
To define the namespace, keysets, and module for this coding project:
-
Open the
starter-auth.pactfile in your code editor and save it asauth.pact. -
Enter the
freenamespace as the workspace for the keysets and module.(namespace "dev") -
Define and read the
module-adminadministrative keyset in thefreenamespace as the owner of theauthmodule.(define-keyset "dev.module-admin"
(read-keyset "module-admin-keyset")) -
Define and read the
operate-adminoperator keyset to control who can create new user accounts.(define-keyset "dev.operate-admin"
(read-keyset "module-operate-keyset")) -
Create a module named
auththat is governed by anAUTHcapability that enforces the administrative keyset.(module auth AUTH
(defcap AUTH ()
(enforce-guard "dev.module-admin"))
;; Module declaration
) -
Save your changes.
For more information about defining and reading keysets, see define-keyset. For more information about defining governance capabilities, see Module governance.
Define the schema and table
The auth modules stores information about user accounts in the users-table database table.
The schema for this table is named user with two columns:
| Field name | Field type |
|---|---|
| nickname | string |
| keyset | guard |
To define the schema and table:
-
Open the modified
auth.pactfile in your code editor. -
Define a
userschema for a table with the columnsnicknamewith the type ofstringandkeysetwith the type ofguard.(defschema user
nickname:string
keyset:guard
) -
Define the
users-tableto use the{user}schema you created in the previous step.(deftable users-table:{user}) -
Move the closing parenthesis that marks the end of the
authmodule declaration after the table definition to include the schema and table inside of the module.Without comments, your code should look similar to the following:
(define-namespace "dev" (read-keyset "module-admin-keyset") (read-keyset "module-admin-keyset"))
(namespace "dev")
(define-keyset "dev.module-admin"
  (read-keyset "module-admin-keyset"))
(define-keyset "dev.operate-admin"
  (read-keyset "module-operate-keyset"))
(module auth AUTH
(defcap AUTH ()
(enforce-guard "dev.module-admin"))
(defschema user
nickname:string
keyset:guard)
(deftable users-table:{user})
)
For more information about creating schemas and tables, see the descriptions for the defschema and deftable keywords.
Define functions
For this coding project, the auth module provides the following functions:
create-userto allow users with theoperate-adminkeyset to add rows to the user table.enforce-user-authto restrict access permissions to users with a given id.change-nicknameto allow users with a specific keyset to update their nickname.rotate-keysetto allow the owner of a keyset to change the keyset being used.
These functions give users the ability to create and manage their own accounts.
Define the create-user function
The create-user function specifies that only users with the operate-admin keyset can add rows to the user table.
To define the create-user function:
-
Open the modified
auth.pactfile in your code editor. -
Start the
create-userfunction definition with the keyworddefunand add the parametersid,nickname, andkeyset.(defun create-user:string (id:string nickname:string keyset:guard)
) -
Within the function, use
enforce-keysetto restrict access to this function, so that new users can only be created by theoperate-adminkeyset.(enforce-guard "dev.operate-admin") -
Within the function, insert a row into the
users-tablewith the specifiednicknameandkeyset.(insert users-table id {
"keyset": keyset,
"nickname": nickname
}
)Without comments, your code should look similar to the following:
(define-namespace "dev" (read-keyset "module-admin-keyset") (read-keyset "module-admin-keyset"))
(namespace "dev")
(define-keyset "dev.module-admin"
(read-keyset "module-admin-keyset"))
(define-keyset "dev.operate-admin"
(read-keyset "module-operate-keyset"))
(module auth AUTH
(defcap AUTH ()
(enforce-guard "dev.module-admin"))
(defschema user
nickname:string
keyset:guard)
(deftable users-table:{user})
(defun create-user:string (id:string nickname:string keyset:keyset)
(enforce-keyset "dev.operate-admin")
  (insert users-table id {
     "keyset": keyset,
     "nickname": nickname
    }
  )
)
)
For more information, see the descriptions for the enforce-guard and insert functions.
Define the enforce-user-auth function
It’s sometimes useful to restrict access to specific data for specific users. For example, you might want to prevent users from seeing account balances or other sensitive information that should be private. In Pact, you can restrict access to specific rows in a table by using row-level keysets.
To define a row-level keyset, you must first be able to view the keyset associated with a specific key-row.
The following example demonstrates reading a keyset for a specified id key-row:
(defun enforce-keyset-of-id (id)
  (with-read table id { "keyset" := keyset }
  (enforce-guard keyset)
  keyset)
)
The purpose of this function is only to identify the keyset associated with the specified id key-row.
This function doesn’t provide access to any of the data in the row.
However, other functions can call this function if they want to act on the information, for example, to place row-level restrictions on the data.
To define the enforce-user-auth function:
-
Open the modified
auth.pactfile in your code editor. -
Start the
enforce-user-authfunction definition that takes the parameterid.(defun enforce-user-auth (id:string)
) -
Within the function, use
with-readto read theusers-tableto find the specifiedid, and bind thekeysetcolumn for theidto thekvariable, then return thekeysetvalue with thekvariable.(with-read users-table id { "keyset":= k }
(enforce-guard k)
k)Without comments, your code should look similar to the following:
(define-namespace "dev" (read-keyset "module-admin-keyset") (read-keyset "module-admin-keyset"))
(namespace "dev")
(define-keyset "dev.module-admin"
(read-keyset "module-admin-keyset"))
(define-keyset "dev.operate-admin"
(read-keyset "module-operate-keyset"))
(module auth AUTH
(defcap AUTH ()
(enforce-guard "dev.module-admin"))
(defschema user
nickname:string
keyset:guard)
(deftable users-table:{user})
(defun create-user:string (id:string nickname:string keyset:keyset)
(enforce-keyset "dev.operate-admin")
(insert users-table id {
"keyset": keyset,
"nickname": nickname
}
)
)
(defun enforce-user-auth:guard (id:string)
(with-read users-table id { "keyset":= k }
   (enforce-guard k)
   k)
)
)
For more information, see the descriptions for the enforce-guard and with-read functions.
Define the change-nickname function
After you define a function to restrict access to data, you can allow users to take specific actions based on the data they have access to. For example, users might want to update their profile name, or make changes to sensitive information that other users should not be able to access.
To do that, you can write a function that calls the enforce-user-auth function to only allow users to update their own data.
For example, the following update-data function allows users to update existing information in the example-table by leveraging the enforce-keyset-of-id function:
(defun update-data (id new-data)
  (enforce-keyset-of-id id)
  (update example-table id { "data": new-data })
  (format "Data updated in row {} to {}" [id new-data]))
By calling the enforce-keyset-of-id function, this function allows users with a specific keyset to make updates to restricted information.
To define the change-nickname function:
-
Open the modified
auth.pactfile in your code editor. -
Start the
change-nicknamefunction definition that takes the parametersidandnew-name.
(defun change-nickname:string (id:string new-name:string) )
2. Within the function, use the `enforce-user-auth` function to enforce authorization for the specified `id`.

 ```pact
 (enforce-user-auth id)
-
Within the function, call the
updatefunction to update thenicknamecolumn for the specifiedid.(update users-table id { "nickname": new-name }) -
Within the function, return a message to the user formatted as "Updated name for user [id] to [name]".
(format "Updated name for user {} to {}" [id new-name])Without comments, your code should look similar to the following:
(define-namespace "dev" (read-keyset "module-admin-keyset") (read-keyset "module-admin-keyset"))
(namespace "dev")

(define-keyset "dev.module-admin"
   (read-keyset "module-admin-keyset"))
(define-keyset "dev.operate-admin"
   (read-keyset "module-operate-keyset"))

(module auth AUTH
  (defcap AUTH ()
    (enforce-guard "dev.module-admin"))

  (defschema user
     nickname:string
     keyset:guard)

  (deftable users-table:{user})

  (defun create-user:string (id:string nickname:string keyset:keyset)
      (enforce-keyset "dev.operate-admin")
      (insert users-table id {
          "keyset": keyset,
          "nickname": nickname
        }
      )
   )

   (defun enforce-user-auth:guard (id:string)
      (with-read users-table id { "keyset":= k }
      (enforce-guard k)
      k)
   )

   (defun change-nickname:string (id:string new-name:string)
      (enforce-user-auth id)
      (update users-table id { "nickname": new-name })
      (format "Updated name for user {} to {}" [id new-name])
   )
)
For more information, see the descriptions for the update and format functions.
Define the rotate-keyset function
Now that users can update their name, you can apply this same functionality to other information. For this coding project, you can allow users to update their authorized keyset. Being able to rotate the keyset is similar to being able to update your password. For single key keysets, this feature enables a user to replace a potentially compromised key. For keysets with multiple keys, this feature enables the set of owners or authorized signers to change when needed.
To define the rotate-keyset function:
-
Open the modified
auth.pactfile in your code editor. -
Start the
rotate-keysetfunction definition that takes the parametersidandnew-keyset.
(defun rotate-keyset:string (id:string new-keyset:string) )
2. Within the function, use the `enforce-user-auth` function to enforce authorization for the specified `id`.

 ```pact
 (enforce-user-auth id)
-
Within the function, call the
updatefunction to update thekeysetcolumn to thenew-keysetfor the specifiedid.(update users-table id { "keyset": new-keyset }) -
Within the function, return a message describing the update in the format "Updated keyset for user [id]".
(format "Updated keyset for user {}" [id])Without comments, your code should look similar to the following:
(define-namespace "dev" (read-keyset "module-admin-keyset") (read-keyset "module-admin-keyset"))
(namespace "dev")

(define-keyset "dev.module-admin"
   (read-keyset "module-admin-keyset"))
(define-keyset "dev.operate-admin"
   (read-keyset "module-operate-keyset"))

(module auth AUTH
  (defcap AUTH ()
    (enforce-guard "dev.module-admin"))

  (defschema user
     nickname:string
     keyset:guard)

  (deftable users-table:{user})

  (defun create-user:string (id:string nickname:string keyset:keyset)
      (enforce-keyset "dev.operate-admin")
      (insert users-table id {
          "keyset": keyset,
          "nickname": nickname
        }
      )
   )

   (defun enforce-user-auth:guard (id:string)
      (with-read users-table id { "keyset":= k }
      (enforce-guard k)
      k)
   )

   (defun change-nickname:string (id:string new-name:string)
      (enforce-user-auth id)
      (update users-table id { "nickname": new-name })
      (format "Updated name for user {} to {}" [id new-name])
   )

   (defun rotate-keyset:string (id:string new-keyset:guard)
      (enforce-user-auth id)
      (update users-table id { "keyset": new-keyset})
      (format "Updated keyset for user {}" [id])
   )
)
For more information about updating a table, see Update.
Create table
Although you defined a schema and a table inside of the auth module, tables are created outside of the module code.
This distinction between what you define inside of the module and outside of the module is important because the module acts as a guard to protect access to database functions and records.
This separation also allows module code to be potentially updated without replacing the table in Pact state.
To create the table:
-
Open the modified
auth.pactfile in your code editor. -
Locate the closing parenthesis for the
authmodule. -
Create the table using the
create-tablereserved keyword.(create-table users-table)
The code for the Rotate authorized keys smart contract is now complete. From here, the next steps involve testing module functions, adding features, and deploying the contract in your local development environment or the Kadena public test network.
Create a file for local testing
The most common way to test Pact modules is to create a <module-name>.repl file that uses REPL-only built-in functions to simulate data that must be provided by the environment, like keysets and signatures.
In this part of the project, you'll see how to create a test file—the auth.repl file—to call REPL-only functions to test the functions you've defined in the auth module.
To create the test file:
-
Create a new
auth.replfile in your code editor. -
Add a transaction that loads the
authmodule using thebegin-txandcommit-txbuilt-in functions.(begin-tx)
(load "auth.pact")
(commit-tx) -
Add a transaction that imports the
authmodule, sets environment data to simulate keyset information, and creates three test user accounts.;; Import the "auth" module and set basic environment data.
(begin-tx)
(use auth)
(env-data
{
"admin-keyset" : ["admin"],
"sarah-keyset": ["sarah"],
"james-keyset": ["james"]
}
)
;; Use the create-user function to create three accounts.
(create-user "admin" "Administrator" (read-keyset "admin-keyset"))
(create-user "Sarah" "Sarah" (read-keyset "sarah-keyset"))
(create-user "James" "James" (read-keyset "james-keyset"))
(commit-tx) -
Add a transaction to test the
enforce-user-authfunction with failure and successful scenarios.;; Test an expected failure
(begin-tx "Test enforce user authentication")
(use dev.auth)
(expect-failure "Keyset not in scope" "Keyset failure (keys-all)" (enforce-user-auth "Sarah"))
;; Specify the keyset and expect the operation to succeed
(env-keys ["sarah"])
(enforce-user-auth "Sarah")
(commit-tx) -
Add a transaction to test the
change-nicknamefunction with failure and successful scenarios.(begin-tx "Test change nickname")
(use dev.auth)
(env-keys [""])
(expect-failure "Keyset not in scope" "Keyset failure (keys-all)" (change-nickname "Sarah" "Sarah"))
;; Specify the keyset and expect the operation to succeed
(env-keys ["sarah", "james"])
(change-nickname "Sarah" "Sarah")
(change-nickname "James" "James")
(env-keys [""])
(commit-tx) -
Add a transaction to test the
rotate-keysetfunction with failure and successful scenarios.(begin-tx "Test rotate keyset")
(use dev.auth)
(env-data
{
"sarah-keyset": ["sarah"],
"james-keyset": ["james"]
}
)
(expect-failure "Keyset not in scope"
"Keyset failure (keys-all)" (rotate-keyset "Sarah" (read-keyset "sarah-keyset")))
(expect-failure "Keyset not in scope"
"Keyset failure (keys-all)" (rotate-keyset "James" (read-keyset "james-keyset")))
;; Specify the keyset and expect the operation to succeed
(env-keys ["sarah", "james"])
(rotate-keyset "Sarah" (read-keyset "james-keyset"))
(rotate-keyset "James" (read-keyset "sarah-keyset"))
(commit-tx) -
Open a terminal shell on your computer and test execution by running the following command:
pact auth.repl --traceYou should see output similar to the following:
auth.repl:1:0-1:51:Trace: "Setting transaction keys"
auth.repl:2:0-5:47:Trace: "Setting transaction data"
auth.repl:11:0-11:10:Trace: "Begin Tx 0"
auth.repl:12:2-12:20:Trace: "Loading    auth.pact..."
auth.pact:5:0-5:96:Trace: "Namespace defined: dev"
auth.pact:6:0-6:17:Trace: "Namespace set to dev"
auth.pact:9:0-10:39:Trace: "Keyset write success"
auth.pact:13:0-14:41:Trace: "Keyset write success"
auth.pact:18:0-85:1:Trace: Loaded module dev.auth, hash Wbu3gTpE0umJ5F_yNTzBq-puX0Ts78aUrYMA4-548y4
auth.pact:90:0-90:26:Trace: "TableCreated"
auth.repl:13:0-13:11:Trace: "Commit Tx 0"
auth.repl:16:0-16:10:Trace: "Begin Tx 1"
auth.repl:17:2-17:19:Trace: "Namespace set to dev"
auth.repl:18:2-18:12:Trace: Loaded imports from auth
auth.repl:19:2-25:3:Trace: "Setting transaction data"
auth.repl:28:2-28:68:Trace: "Write succeeded"
auth.repl:29:2-29:60:Trace: "Write succeeded"
auth.repl:30:2-30:61:Trace: "Write succeeded"
auth.repl:32:0-32:11:Trace: "Commit Tx 1"
auth.repl:35:0-35:45:Trace: "Begin Tx 2 Test enforce user authentication"
auth.repl:36:2-36:16:Trace: Loaded imports from dev.auth
auth.repl:38:2-38:96:Trace: "Expect failure: Success: Keyset not in scope"
auth.repl:41:2-41:22:Trace: "Setting transaction keys"
auth.repl:42:2-42:29:Trace: KeySet {keys: [sarah],pred: keys-all}
auth.repl:44:0-44:11:Trace: "Commit Tx 2 Test enforce user authentication"
auth.repl:47:0-47:33:Trace: "Begin Tx 3 Test change nickname"
auth.repl:48:2-48:16:Trace: Loaded imports from dev.auth
auth.repl:49:2-49:17:Trace: "Setting transaction keys"
auth.repl:50:2-50:102:Trace: "Expect failure: Success: Keyset not in scope"
auth.repl:53:2-53:31:Trace: "Setting transaction keys"
auth.repl:54:2-54:34:Trace: "Updated name for user Sarah to Sara"
auth.repl:55:2-55:33:Trace: "Updated name for user James to Jim"
auth.repl:56:2-56:17:Trace: "Setting transaction keys"
auth.repl:58:0-58:11:Trace: "Commit Tx 3 Test change nickname"
auth.repl:61:0-61:31:Trace: "Begin Tx 4 Test rotate keyset"
auth.repl:62:2-62:16:Trace: Loaded imports from dev.auth
auth.repl:63:2-68:3:Trace: "Setting transaction data"
auth.repl:70:2-71:85:Trace: "Expect failure: Success: Keyset not in scope"
auth.repl:72:2-73:85:Trace: "Expect failure: Success: Keyset not in scope"
auth.repl:76:2-76:31:Trace: "Setting transaction keys"
auth.repl:77:2-77:53:Trace: "Updated keyset for user Sarah"
auth.repl:78:2-78:53:Trace: "Updated keyset for user James"
auth.repl:80:0-80:11:Trace: "Commit Tx 4 Test rotate keyset"
Load successful
You can also test functions interactively by loading the file into the Pact REPL. Type
pactin a terminal shell to open the Pact REPL environment.pact> (env-keys ["admin", "moduleadmin", "operateadmin"])
"Setting transaction keys"
pact> (env-data{"module-admin-keyset": ["moduleadmin"],"module-operate-keyset": ["operateadmin"]})
"Setting transaction data"
pact> (load "auth.pact")
"Loading auth.pact..."
"Namespace defined: dev"
"Namespace set to dev"
"Keyset write success"
"Keyset write success"
Loaded module dev.auth, hash Wbu3gTpE0umJ5F_yNTzBq-puX0Ts78aUrYMA4-548y4
"TableCreated"You can then set environment data and call functions interactively. For example, to create the
sarahuser:pact> (env-data{"sarah-keyset":["sarah-keyset"]})
"Setting transaction data"
pact> (dev.auth.create-user "sarah" "Sarah Rae Fitzpatrick" (read-keyset "sarah-keyset"))
"Write succeeded"
Deploy the contract
After testing the contract using the Pact interpreter and the REPL file, you can deploy the contract on your local development network or the Kadena test network.
However, you must deploy to an existing namespace—such as the free namespace—or a registered principal namespace to deploy on any Kadena network.
If you want to deploy in an existing namespace, you must also ensure that your module name and keyset name are unique across all of the modules that exist in that namespace.
In general, the best practice is to create a principal namespace for deploying your modules.
Verify network, chain, and account information
Before you deploy on the local development network, verify the following:
-
The development network is currently running on your local computer.
-
You have at least one account with funds on at least one chain in the development network.
If you don't have keys and at least one account on any chain on the network, you need to generate keys, create an account, and fund the account on at least one chain before continuing.
-
You have the public key for the account on the chain where you have funds.
Create a principal namespace
For this coding project, you can define a principal namespace by executing a transaction using the following simple-define-namespace.ktpl transaction template.
code: |-
  (define-namespace (ns.create-principal-namespace (read-keyset "k")) (read-keyset "k") (read-keyset "k"))
data:
  {
    "k": [
        "{{public-key}}"
    ]
  }
meta:
  chainId: "{{chain-id}}"
  sender: "{{{sender-account}}}"
  gasLimit: 80300
  gasPrice: 0.000001
  ttl: 600
signers:
  - public: "{{public-key}}"
    caps:
      - name: "coin.GAS"
        args: []
networkId: "{{network-id}}"
You can use kadena tx add to replace the variables in the template with the values for your public key, sender account, chain, and network.
For example:
? Which template do you want to use: simple-define-namespace.ktpl
? File path of data to use for template .json or .yaml (optional):
? Template value public-key: a6731ce7...93119689
? Template value chain-id: 3
? Template value sender-account: k:a6731ce7...93119689
? Template value network-id: development
? Where do you want to save the output: myNamespace
After you save the transaction to a file, you can use kadena tx sign to sign the transaction with your wallet password or public and secret keys.
After signing the transaction, you can use kadena tx send to send the transaction to the blockchain network.
After the transaction is complete, copy the principal namespace from the transaction results and use it to replace all occurrences of the original "dev" namespace.
(namespace "n_1cc1f83c56f53b8865cc23a61e36d4b17e73ce9e")
(define-keyset "n_1cc1f83c56f53b8865cc23a61e36d4b17e73ce9e.admin-keyset" (read-keyset "admin-keyset"))
(module payments "n_1cc1f83c56f53b8865cc23a61e36d4b17e73ce9e.admin-keyset" ...)
Create a deployment transaction
You can deploy the auth.pact module on the local development network using the same workflow of kadena tx add, sign, and send commands that you used to execute the define-namespace transaction.
To deploy the module:
-
Create a new transaction template named
coding-project.ktplin the~/.kadena/transaction-templatesfolder.cd ~/.kadena/transaction-templates
touch coding-project.ktpl -
Open the
coding-project.ktplfile in a code editor and create a reusable transaction request in YAML format similar to the following to specify the path to theauth.pactfile that contains your Pact module code.codeFile: "../../auth.pact"
data:
module-admin-keyset:
keys: ["{{admin-public-key}}"]
pred: "keys-all"
module-operate-keyset:
keys: ["{{operate-public-key}}"]
pred: "keys-all"
meta:
chainId: "{{chain-id}}"
sender: "{{{sender-account}}}"
gasLimit: 80300
gasPrice: 0.000001
ttl: 600
signers:
- public: "{{public-key}}"
caps: []
networkId: "{{network-id}}" -
Create a transaction that uses the template by running the
kadena tx addcommand and following the prompts displayed.For example:
? Which template do you want to use: coding-project.ktpl
? File path of data to use for template .json or .yaml (optional):
? Template value admin-public-key: a6731ce7...93119689
? Template value operate-public-key: 1d5a5e10...0b242ed4
? Template value chain-id: 3
? Template value sender-account: k:a6731ce7...93119689
? Template value public-key: a6731ce7...93119689
? Template value network-id: development
? Where do you want to save the output: auth-deploy
In this example, the unsigned transaction is saved in a
auth-deploy.jsonfile. -
Sign the transaction by running the
kadena tx signcommand and following the prompts displayed to sign with a wallet account or a public and secret key pair.For example:
? Select an action: Sign with wallet
? Select a transaction file: Transaction: auth-deploy.json
? 1 wallets found containing the keys for signing this transaction, please select a wallet to sign this transaction with first: Wallet: pistolas
? Enter the wallet password: ******** -
Send the transaction by running the
kadena tx sendcommand and following the prompts displayed.After the transaction is complete, you should see the message
TableCreatedin the transaction results.
Create additional transactions
After you deploy the module, you can create additional transactions to verify contract functions running on the development network.
For example, you can create a transaction template for the auth.create-user function similar to the following:
code: |-
  (n_1cc1f83c56f53b8865cc23a61e36d4b17e73ce9e.auth.create-user "{{user-id}}" "{{user-nickname}}" (read-keyset "{{user-guard}}"))
data:
  {{user-guard}}:
    keys:
      - "{{user-publicKey}}"
    pred: "{{user-predicate}}"
meta:
  chainId: "{{chain-id}}"
  sender: "{{sender-account}}"
  gasLimit: 2000
  gasPrice: 0.00000001
  ttl: 7200
signers:
  - public: "{{signer-public-key}}"
    caps: []
networkId: "{{networkId}}"
type: exec
With this template, you can create a transaction that adds the specified user id, nickname, and guard to the users-table.
For example, this template prompts you to provide the user details when you run kadena tx add:
Which template do you want to use: create-user.ktpl
? File path of data to use for template .json or .yaml (optional):
? Template value user-id: sarah
? Template value user-nickname: Sarah Rae Foster
? Template value user-guard: sarah-keyset
? Template value user-publicKey: 1d5a5e10...0b242ed4
? Template value user-predicate: keys-all
? Template value chain-id: 3
? Template value sender-account: k:1d5a5e10...0b242ed4
? Template value signer-public-key: 1d5a5e10...0b242ed4
? Template value networkId: development
? Where do you want to save the output: SARAH