Gas station accounts
In the Gas station account coding project, you'll learn how to create a smart contract that allows application users to complete a transaction on the blockchain without having an account or any tokens to pay the transaction fee. With this smart contract, an autonomous account is used to pay transaction fees on behalf of users. The autonomous account—often referred to as a gas station—simplifies the user experience and eliminates the friction associated with onboarding users who are new to blockchain technology, digital wallets, transaction signing, and managing public and secret keys. Gas station accounts make it easier for new users to interact with applications, but require some extra work by the application developer. For example, you'll most likely want to set limits on how and when the funds in the gas station account can be used to prevent the account balance from being drained too quickly or funding transactions that require a lot of computational overhead.
In this coding project, you'll see a simple example of how to create a coin contract account that pays transaction fees—that is, the gas fees—on behalf of users.
This coding project explores how to:
- Create a gas station principal account with a capability guard.
- Implement the interface required to allow the account to pay transaction fees for any type of transaction.
- Scope the gas station account to only pay transaction fees for transactions that meet specific criteria.
By completing this project, you'll have a basic understanding of the functions used to create a secure gas station account and how to set limits to protect the account from misuse.
Principal accounts and guards
A gas station account is similar to any other coin contract account.
It must have an account name, guard, and balance, so that it can be uniquely identified, sign transactions securely, and hold funds for paying fees.
However, it's important for you to restrict access to the gas station account to ensure it's only used as intended.
The primary way to secure access to the gas station account is by creating it as a principal account with a unique guard.
For an introduction to principal accounts, see Accounts, keys, and principals.
For information about the different types of guards, see Guards.
The following example illustrates how to use the create-user-guard and create-principal functions to create a coin account with a user guard for the allow function:
(namespace "free")
(module test-gas GOV
     (defcap GOV() true)
     (defun allow() true)
)

(let ((guard (create-user-guard (test-gas.allow))))
  (coin.create-account (create-principal guard) guard)
)
The coin.create-account function creates a new principal account with a user guard in the coin-table with a default balance of 0.0.
You can use similar code to create a new account that makes use of a capability guard.
For example:
(namespace "free")
(module test-gas GOV
     (defcap GOV() true)
     (defcap ALLOW-ALL() true)
)

(let ((guard (create-capability-guard (test-gas.ALLOW-ALL))))
   (coin.create-account (create-principal guard) guard)
)
A capability guard is an essential part of the code that makes creating a gas station principal account possible.
In the next step, you'll implement the gas-payer-v1 interface to add a GAS_PAYER capability and guard to your module.
Before you begin
Before starting this project, verify your environment meets the following basic requirements:
- You have a GitHub account and can run
gitcommands. - You have installed the Pact programming language and command-line interpreter.
- You have installed the
kadena-clipackage and have a working directory with initial configuration settings. - You have a local development node that you can connect to that runs the
chainweb-nodeprogram, either in a Docker container or on a physical or virtual computer. - You must have at least one account that's funded with KDA on at least one chain for deployment on the local development network or the Kadena test network.
- You should be familiar with the basics for defining modules and using keysets.
Get the starter code
To get started:
-
Open a terminal shell on your computer.
-
Clone the
pact-coding-projectsrepository by running the following command:git clone https://github.com/kadena-docs/pact-coding-projects.git -
Change to the
04-gas-stationdirectory by running the following command:cd pact-coding-projects/04-gas-stationIf you list the contents of this directory, you'll see the following files:
starter-gas-account.pactprovides a framework for the project code in comments.gas-account.pactcontains the final module code for the sample gas account.gas-account.replprovides the complete test file for testing the finalgas-account.pactfile.
-
Open and review the
starter-gas-account.pactfile.This file describes all of the tasks that you need to complete for the Gas station accounts coding project. You can follow the instructions embedded in the file to try to tackle this coding project on your own without looking at the solutions to each step, or follow the instructions in the next sections if you need additional guidance.
Implement the gas payer interface
Because paying gas fees is a common operation, the gas-payer-v1 interface is defined in a module that's deployed by default on the Kadena development, test, and main networks.
For this coding project, you'll implement this interface in a new Pact module—the test-gas module—in a gas-account.pact file.
To create the gas station module:
-
Open the code editor on your computer.
-
Create a new
gas-account.pactfile. -
Add the minimal Pact code required to define a module.
Remember that a module requires the following information:
- namespace
- governing keyset or capability
- at least one function
The function in this case is an implementation of the
gas-payer-v1interface as defined in thegas-payer-v1.pactfile. For example:(namespace "free")
(define-keyset "free.dev-account" (read-keyset "dev-account" ))
(module test-gas GOVERNANCE
(defcap GOVERNANCE ()
(enforce-guard "free.pistolas-dev-account"))
(implements gas-payer-v1)
)To deploy the gas station module, you must use an existing namespace such as your principal namespace or the
"free"namespace. For local testing, you can create thetest-gasmodule in a custom namespace that you define for the local development network.After you issue the
implements gas-payer-v1statement, you must implement the capabilities, types, and functions that are defined in thegas-payer-v1.pactfile in thetest-gasmodule. The interface definition looks like this:(interface gas-payer-v1
(defcap GAS_PAYER:bool
( user:string
limit:integer
price:decimal
)
@doc
" Provide a capability indicating that declaring module supports \
\ gas payment for USER for gas LIMIT and PRICE. Functionality \
\ should require capability (coin.FUND_TX), and should validate \
\ the spend of (limit * price), possibly updating some database \
\ entry. \
\ Should compose capability required for 'create-gas-payer-guard'."
)
(defun create-gas-payer-guard:guard ()
@doc
" Provide a guard suitable for controlling a coin account that can \
\ pay gas via GAS_PAYER mechanics. Generally this is accomplished \
\ by having GAS_PAYER compose a capability without parameters, \
\ that is required in this guard. Thus, if coin contract is able to \
\ successfully acquire GAS_PAYER, the composed 'anonymous' cap required \
\ here will be in scope, and gas buy will succeed."
)
) -
Implement the
GAS_PAYERcapability as defined in thegas-payer-v1.pactfile and compose an inner capability calledALLOW_GASto use as a guard for the account used to pay transaction fees:(defcap GAS_PAYER:bool
( user : string
limit : integer
price : decimal
)
(compose-capability (ALLOW_GAS))
)
(defcap ALLOW_GAS () true)
(defun create-gas-payer-guard:guard ()
(create-capability-guard (ALLOW_GAS))
)With this code, an account granted the
GAS_PAYERcapability can pay gas fees for any transaction. In addition, thecreate-gas-payer-guardfunction uses the built-increate-capability-guardfunction to return a guard for theALLOW_GAScapability.
Test the gas payer implementation
At this point, you have a basic implementation of the gas-payer-v1 interface that can be used to pay transaction fees but without any other scoping or restrictions.
Before deploying the new module or updating it to be more restrictive, you should prepare a script for testing operations locally.
To test the module locally, you'll need to add the contracts that the gas station module depends on to your local environment.
To prepare a test file:
-
Open the code editor on your computer.
-
Copy the following required files to your working directory:
coin-v5.pact
fungible-v2.pact
fungible-xchain-v1.pact
gas-payer-v1.pact
Copying these files to your local environment is required because the contracts aren't deployed in the Pact REPL by default.
-
Create a new
gas-account.replfile to provide all of the environment data required for the module, including the namespace, keys, signatures, and contracts.For example, the initial environment information for the
gas-accountmight look similar to the following:(env-data
{ "dev-account":
{ "keys" : [ "58705e8699678bd15bbda2cf40fa236694895db614aafc82cf1c06c014ca963c" ]
, "pred" : "keys-all"
}
}
)
(env-sigs
[{ "key" : "58705e8699678bd15bbda2cf40fa236694895db614aafc82cf1c06c014ca963c"
, "caps" : []
}]
)
(begin-tx "Define principal namespace")
(define-namespace "free" (read-keyset "dev-account" ) (read-keyset "dev-account" ))
(commit-tx)
(begin-tx "Define admin-keyset")
(namespace "free")
(define-keyset "free.dev-account" (read-keyset "dev-account" ))
(commit-tx)
(begin-tx "Load required modules")
(load "fungible-v2.pact")
(load "fungible-xchain-v1.pact")
(load "coin-v5.pact")
(create-table coin-table)
(create-table allocation-table)
(load "gas-payer-v1.pact")
(commit-tx) -
Add a call to load the
gas-account.pactfile:(begin-tx "Load gas station module")
(load "gas-account.pact")
(commit-tx) -
Execute the
gas-account.replfile using thepactcommand-line interpreter and the--traceoption:pact gas-account.repl --traceYou should see that the operations are successful with output similar to the following:
gas-account.repl:1:0:Trace: Setting transaction data
gas-account.repl:8:2:Trace: Setting transaction signatures/caps
gas-account.repl:14:0:Trace: Begin Tx 0: Define principal namespace
gas-account.repl:15:2:Trace: Namespace defined: free
gas-account.repl:16:0:Trace: Commit Tx 0: Define principal namespace
gas-account.repl:18:0:Trace: Begin Tx 1: Define admin-keyset
gas-account.repl:19:2:Trace: Namespace set to free
gas-account.repl:20:2:Trace: Keyset defined
gas-account.repl:21:0:Trace: Commit Tx 1: Define admin-keyset
gas-account.repl:23:0:Trace: Begin Tx 2: Load required modules
gas-account.repl:24:3:Trace: Loading fungible-v2.pact...
fungible-v2.pact:1:0:Trace: Loaded interface fungible-v2
gas-account.repl:25:3:Trace: Loading fungible-xchain-v1.pact...
fungible-xchain-v1.pact:1:0:Trace: Loaded interface fungible-xchain-v1
gas-account.repl:26:3:Trace: Loading coin-v5.pact...
coin-v5.pact:1:0:Trace: Loaded module coin, hash rE7DU8jlQL9x_MPYuniZJf5ICBTAEHAIFQCB4blofP4
gas-account.repl:27:3:Trace: TableCreated
gas-account.repl:28:3:Trace: TableCreated
gas-account.repl:29:3:Trace: Loading gas-payer-v1.pact...
gas-payer-v1.pact:1:0:Trace: Loaded interface gas-payer-v1
gas-account.repl:30:0:Trace: Commit Tx 2: Load required modules
gas-account.repl:32:0:Trace: Begin Tx 3: Load gas station module
gas-account.repl:33:3:Trace: Loading gas-account.pact...
gas-account.pact:1:0:Trace: Namespace set to free
gas-account.pact:3:0:Trace: Loaded module free.test-gas, hash rqS8Y5Rp-DxlTQHSKgeDJrRTlGFfoA5eaIKtcctwYN0
gas-account.repl:34:0:Trace: Commit Tx 3: Load gas station module
Load successful
Create the capability-guarded account
To make the gas station account more secure, you can create it using a principal account name and guard access to it by using the ALLOW_GAS capability.
Because the gas station account is a capability-guarded account, the create-principal Pact function creates the principal account name with a c: prefix.
You can then define the gas station account name as a constant in the gas-account.pact file.
To create a capability-guarded account:
-
Open the
gas-account.pactfile in the code editor. -
Add a
GAS_ACCOUNTconstant to store the gas station principal account in the module declaration:(defconst GAS_ACCOUNT (create-principal (create-gas-payer-guard))) -
Add an
initfunction that uses thecoin.create-accountfunction to create the gas station account in the module declaration:(defun init ()
(coin.create-account GAS_ACCOUNT (create-gas-payer-guard))
)In this code:
- The first argument of the function is the account name you defined using the
GAS_ACCOUNTconstant. - The second argument is the guard for the account.
- The first argument of the function is the account name you defined using the
-
Add an expression after the module declaration that calls the
initfunction if the module is deployed with{ "init": true }in the environment data:(if (read-msg "init")
[(init)]
["Not creating the gas station account"]
) -
Save your changes to the
gas-account.pactfile. -
Open the
gas-account.replfile in the code editor. -
Update the
gas-account.replfile to setinittotrueby adding the following lines of code before loading thegas-account.pactfile:(env-data
{ "init": true }
) -
Update the load transaction to display the capability-guarded gas station account name when you execute the file:
(begin-tx "Load gas station module")
   (load "gas-account.pact")
   [GAS_ACCOUNT]
(commit-tx) -
Execute the
gas-account.replfile:pact gas-account.repl --traceYou should see that the transaction completes with output similar to the following:
...
gas-account.repl:36:0:Trace: Begin Tx 3: Load gas station module
gas-account.repl:37:3:Trace: Loading 01-gas-account.pact...
gas-account.pact:1:0:Trace: Namespace set to free
gas-account.pact:3:0:Trace: Loaded module free.test-gas, hash q1bMc2SzjAJrbhUyZJ5t4u8Zktvi9H_xOZqsxZljTA4
gas-account.pact:28:0:Trace: ["Write succeeded"]
gas-account.repl:38:3:Trace: ["c:J1yaCWrdEbhKekMRhF5WjOgvzUayxTD24q7UWHwaa9I"]
gas-account.repl:39:0:Trace: Commit Tx 3: Load gas station module
Load successful
Verify the gas station account
In the previous output, the "Write succeeded" message indicates that you have successfully created the principal account for the gas station to use.
You can verify the account information by adding another transaction to the gas-account.repl file that calls the coin.details function with the account name for the capability-guarded gas station account.
To verify the gas account:
-
Open the
gas-account.replfile in your code editor. -
Add a transaction similar to the following after loading the
gas-account.pactfile:(begin-tx "Verify account")
(coin.details free.test-gas.GAS_ACCOUNT)
(commit-tx) -
Execute the
gas-account.replfile:pact gas-account.repl --traceYou should see that the transaction completes with output similar to the following:
...
gas-account.repl:37:3:Trace: Loading 01-gas-account.pact...
gas-account.pact:1:0:Trace: Namespace set to free
gas-account.pact:3:0:Trace: Loaded module free.test-gas, hash q1bMc2SzjAJrbhUyZJ5t4u8Zktvi9H_xOZqsxZljTA4
gas-account.pact:28:0:Trace: ["Write succeeded"]
gas-account.repl:38:3:Trace: ["c:J1yaCWrdEbhKekMRhF5WjOgvzUayxTD24q7UWHwaa9I"]
gas-account.repl:39:0:Trace: Commit Tx 3: Load gas station module
gas-account.repl:41:0:Trace: Begin Tx 4: Verify account
gas-account.repl:42:3:Trace: {"account": "c:J1yaCWrdEbhKekMRhF5WjOgvzUayxTD24q7UWHwaa9I","balance": 0.0,"guard": CapabilityGuard {name: free.test-gas.ALLOW_GAS,args: [],pactId: }}
gas-account.repl:43:0:Trace: Commit Tx 4: Verify account
Load successful
Scope to specific transactions
Now that you have a capability-guarded gas station account that can be used to pay transaction fees, you can further scope it to only pay for specific transactions or only when specific conditions are met. For example, you might want enforce an upper limit for transaction fees to help ensure that funds in a gas station account aren't drained too quickly.
The following example illustrates how to enforce specific conditions for the use the gas station account. In this example, the gas station administrator can use the gas station account for any transaction. Other users can only use the gas station account to pay transaction fees if the gas price is less than a specified price.
To enforce specific conditions for transactions using the gas station account:
-
Open the
gas-account.pactfile in the code editor. -
Add the
enforce-onefunction to theGAS_PAYERcapability to specify two conditions:(enforce-one
"Allow the administrator to use the gas station account for any transaction."
[
(enforce-guard "free.dev-account" )
(enforce (<= 0.00000001 (at 'gas-price (chain-data)))
"Gas price must be less than 0.00000001"
)
]
)In this example, the
enforce-guardfunction allows the owner of thefree.dev-accountkeyset to the use the gas station account to pay for any transaction. For all other transactions and users, the gas price must be less the specified 0.00000001.You can use a similar approach to limit access to gas station funds based on other conditions. For example, you can set a limit for transaction fees using a function to get the current gas price instead of using a hard-coded value. You can also create conditions that prevent the gas station account from being used to submit continuation requests, that exclude specific module or function calls, or that set time boundaries for paying transaction fees.
Display account details
Before deploying the gas station smart contract, add a function to display the account details when the contract is deployed. You'll need this information to transfer funds to the new account on the network and chain where you deploy the contract.
To add a function that displays the account information:
-
Open the
gas-account.pactfile in the code editor. -
Add the
displayfunction to call thecoin.detailsfunction for theGAS_ACCOUNT:(defun display:object ()
(coin.details free.test-gas.GAS_ACCOUNT)
) -
Add a call to the
displayfunction to the end of the smart contract:(if (read-msg "init")
[(init)]
["Not creating the gas station account"]
)
(free.test-gas.display) -
Open the
gas-account.replfile in the code editor and add a test for the display function.(begin-tx "Test account display")
(free.test-gas.display)
(commit-tx) -
Execute the
gas-account.replfile:pact gas-account.repl --traceYou should see that the transaction completes with output similar to the following:
...
gas-account.repl:45:0:Trace: Begin Tx 5: Test account display
gas-account.repl:46:3:Trace: {"account": "c:J1yaCWrdEbhKekMRhF5WjOgvzUayxTD24q7UWHwaa9I","balance": 0.0,"guard": CapabilityGuard {name: free.test-gas.ALLOW_GAS,args: [],pactId: }}
gas-account.repl:47:0:Trace: Commit Tx 5: Test account display
Deploy the contract
After you've updated and tested the module, you can deploy it on a chain on your local development network or the Kadena test network.
For this example, the contract is deployed in the free namespace using an administrative account that has funds on chain 3 in the development network.
To deploy in the free namespace, the module name and keyset name must be unique across all of the modules that exist in the free namespace.
Prepare to deploy
To prepare to deploy the gas station module on the development network:
-
The development network is currently running on your local computer.
-
You have at least one account with funds on at least one chain in the development network.
If you don't have keys and at least one account on any chain on the network, you need to generate keys, create an account, and fund the account on at least one chain before continuing.
-
You have the public key for the account on the chain where you have funds.
Create a deployment transaction
You can deploy the gas-account.pact module on the local development network using a transaction template.
To deploy the module:
-
Create a new transaction template named
deploy-contract.ktplin the~/.kadena/transaction-templatesfolder.cd ~/.kadena/transaction-templates
touch deploy-contract.ktpl -
Open the
deploy-contract.ktplfile in a code editor and create a reusable transaction request in YAML format similar to the following to specify the path to thegas-account.pactfile that contains your Pact module code.codeFile: "{{path-to-pact-code}}"
data:
admin-keyset:
keys: ["{{public-key}}"]
pred: "keys-all"
init: true
meta:
chainId: "{{chain-id}}"
sender: "{{{sender-account}}}"
gasLimit: 80300
gasPrice: 0.000001
ttl: 600
signers:
- public: "{{public-key}}"
caps: []
networkId: "{{network-id}}" -
Create a transaction that uses the template by running the
kadena tx addcommand and following the prompts displayed.For example:
? Which template do you want to use: deploy-contract.ktpl
? File path of data to use for template .json or .yaml (optional):
? Template value path-to-pact-code: ../../gas-account.pact
? Template value public-key: 58705e8699678bd15bbda2cf40fa236694895db614aafc82cf1c06c014ca963c
? Template value chain-id: 3
? Template value sender-account: k:58705e8699678bd15bbda2cf40fa236694895db614aafc82cf1c06c014ca963c
? Template value network-id: development
? Where do you want to save the output: GasStationAccount
In this example, the unsigned transaction is saved in a
GasStationAccount.jsonfile. -
Sign the transaction by running the
kadena tx signcommand and following the prompts displayed to sign with a wallet account or a public and secret key pair.For example:
? Select an action: Sign with wallet
? Select a transaction file: Transaction: GasStationAccount.json
? 1 wallets found containing the keys for signing this transaction, please select a wallet to sign this transaction with first: Wallet: chainweaver-web-legacy
? Enter the wallet password: ******** -
Send the transaction by running the
kadena tx sendcommand and following the prompts displayed.After the transaction is complete, you should see the account created in the transaction results. For example:

Fund the gas station account
Now that you have created and deployed the gas station account, you're ready to fund the account to pay transaction fees.
You can use the kadena tx commands to create, sign, and send a transfer transaction to the development network.
To fund the gas station account:
-
Verify the development network is currently running on your local computer.
-
Create a new unsigned transaction using the
kadena tx addcommand and thetransfer.ktpltemplate and follow the prompts displayed to select the sender, receiver, and amount to transfer.- For the
account:fromtemplate value, specify the administrative account that is providing funds to the gas station account. In this example, it's the Chainweaver wallet accountk:58705e8699678bd15bbda2cf40fa236694895db614aafc82cf1c06c014ca963c. - For the
account:totemplate value, specify the gas station principal account that you created with the capability guard. In this example, it's the principal accountc:J1yaCWrdEbhKekMRhF5WjOgvzUayxTD24q7UWHwaa9I. - For the
decimal:amounttemplate value, specify the number of coins to transfer as a decimal value. In this example, the transfer amount is2.0.
For example, the prompts and output for creating the transaction look similar to the following:
➜  ~ kadena tx add
? Which template do you want to use: transfer.ktpl
? File path of data to use for template .json or .yaml (optional):
? Select account alias for template value account:from: k-58705e
> Using account name k:58705e8699678bd15bbda2cf40fa236694895db614aafc82cf1c06c014ca963c
? Select account alias for template value account:to: Enter account manually
? Manual entry for account for template value account:to: c:J1yaCWrdEbhKekMRhF5WjOgvzUayxTD24q7UWHwaa9I
? Template value decimal:amount: 2.0
? Template value chain-id: 3
? Template key "key:from" matches account "account:from". Use public account's key? Account public key:
58705e8699678bd15bbda2cf40fa236694895db614aafc82cf1c06c014ca963c
? Select network id for template value networkId: development
? Where do you want to save the output: fund-gas - For the
-
Sign the unsigned transaction using the
kadena tx signcommand and the transaction file name generated by thekadena tx addcommand.For example, the prompts and output for the transaction look similar to the following:
➜  ~ kadena tx sign
? Select an action: Sign with wallet
? Select a transaction file: Transaction: fund-gas.json
? 1 wallets found containing the keys for signing this transaction, please
select a wallet to sign this transaction with first: Wallet: chainweaver-web-legacy
? Enter the wallet password: ******** -
Send the signed transaction using the
kadena tx sendcommand and the signed transaction file name generated by thekadena tx signcommand.For example, the prompts and output for the transaction look similar to the following:
➜ ~ kadena tx send
? Select a transaction file: Transaction: transaction-6DWOi5enSt-signed.json
⠋ Sending transactions...
Transaction detail for command with hash: 6DWOi5enStLe6WjaUOMJfv-RTm3TSrfe_0m1IAH4yac
Network ID Chain ID
development 3
✔ Completed
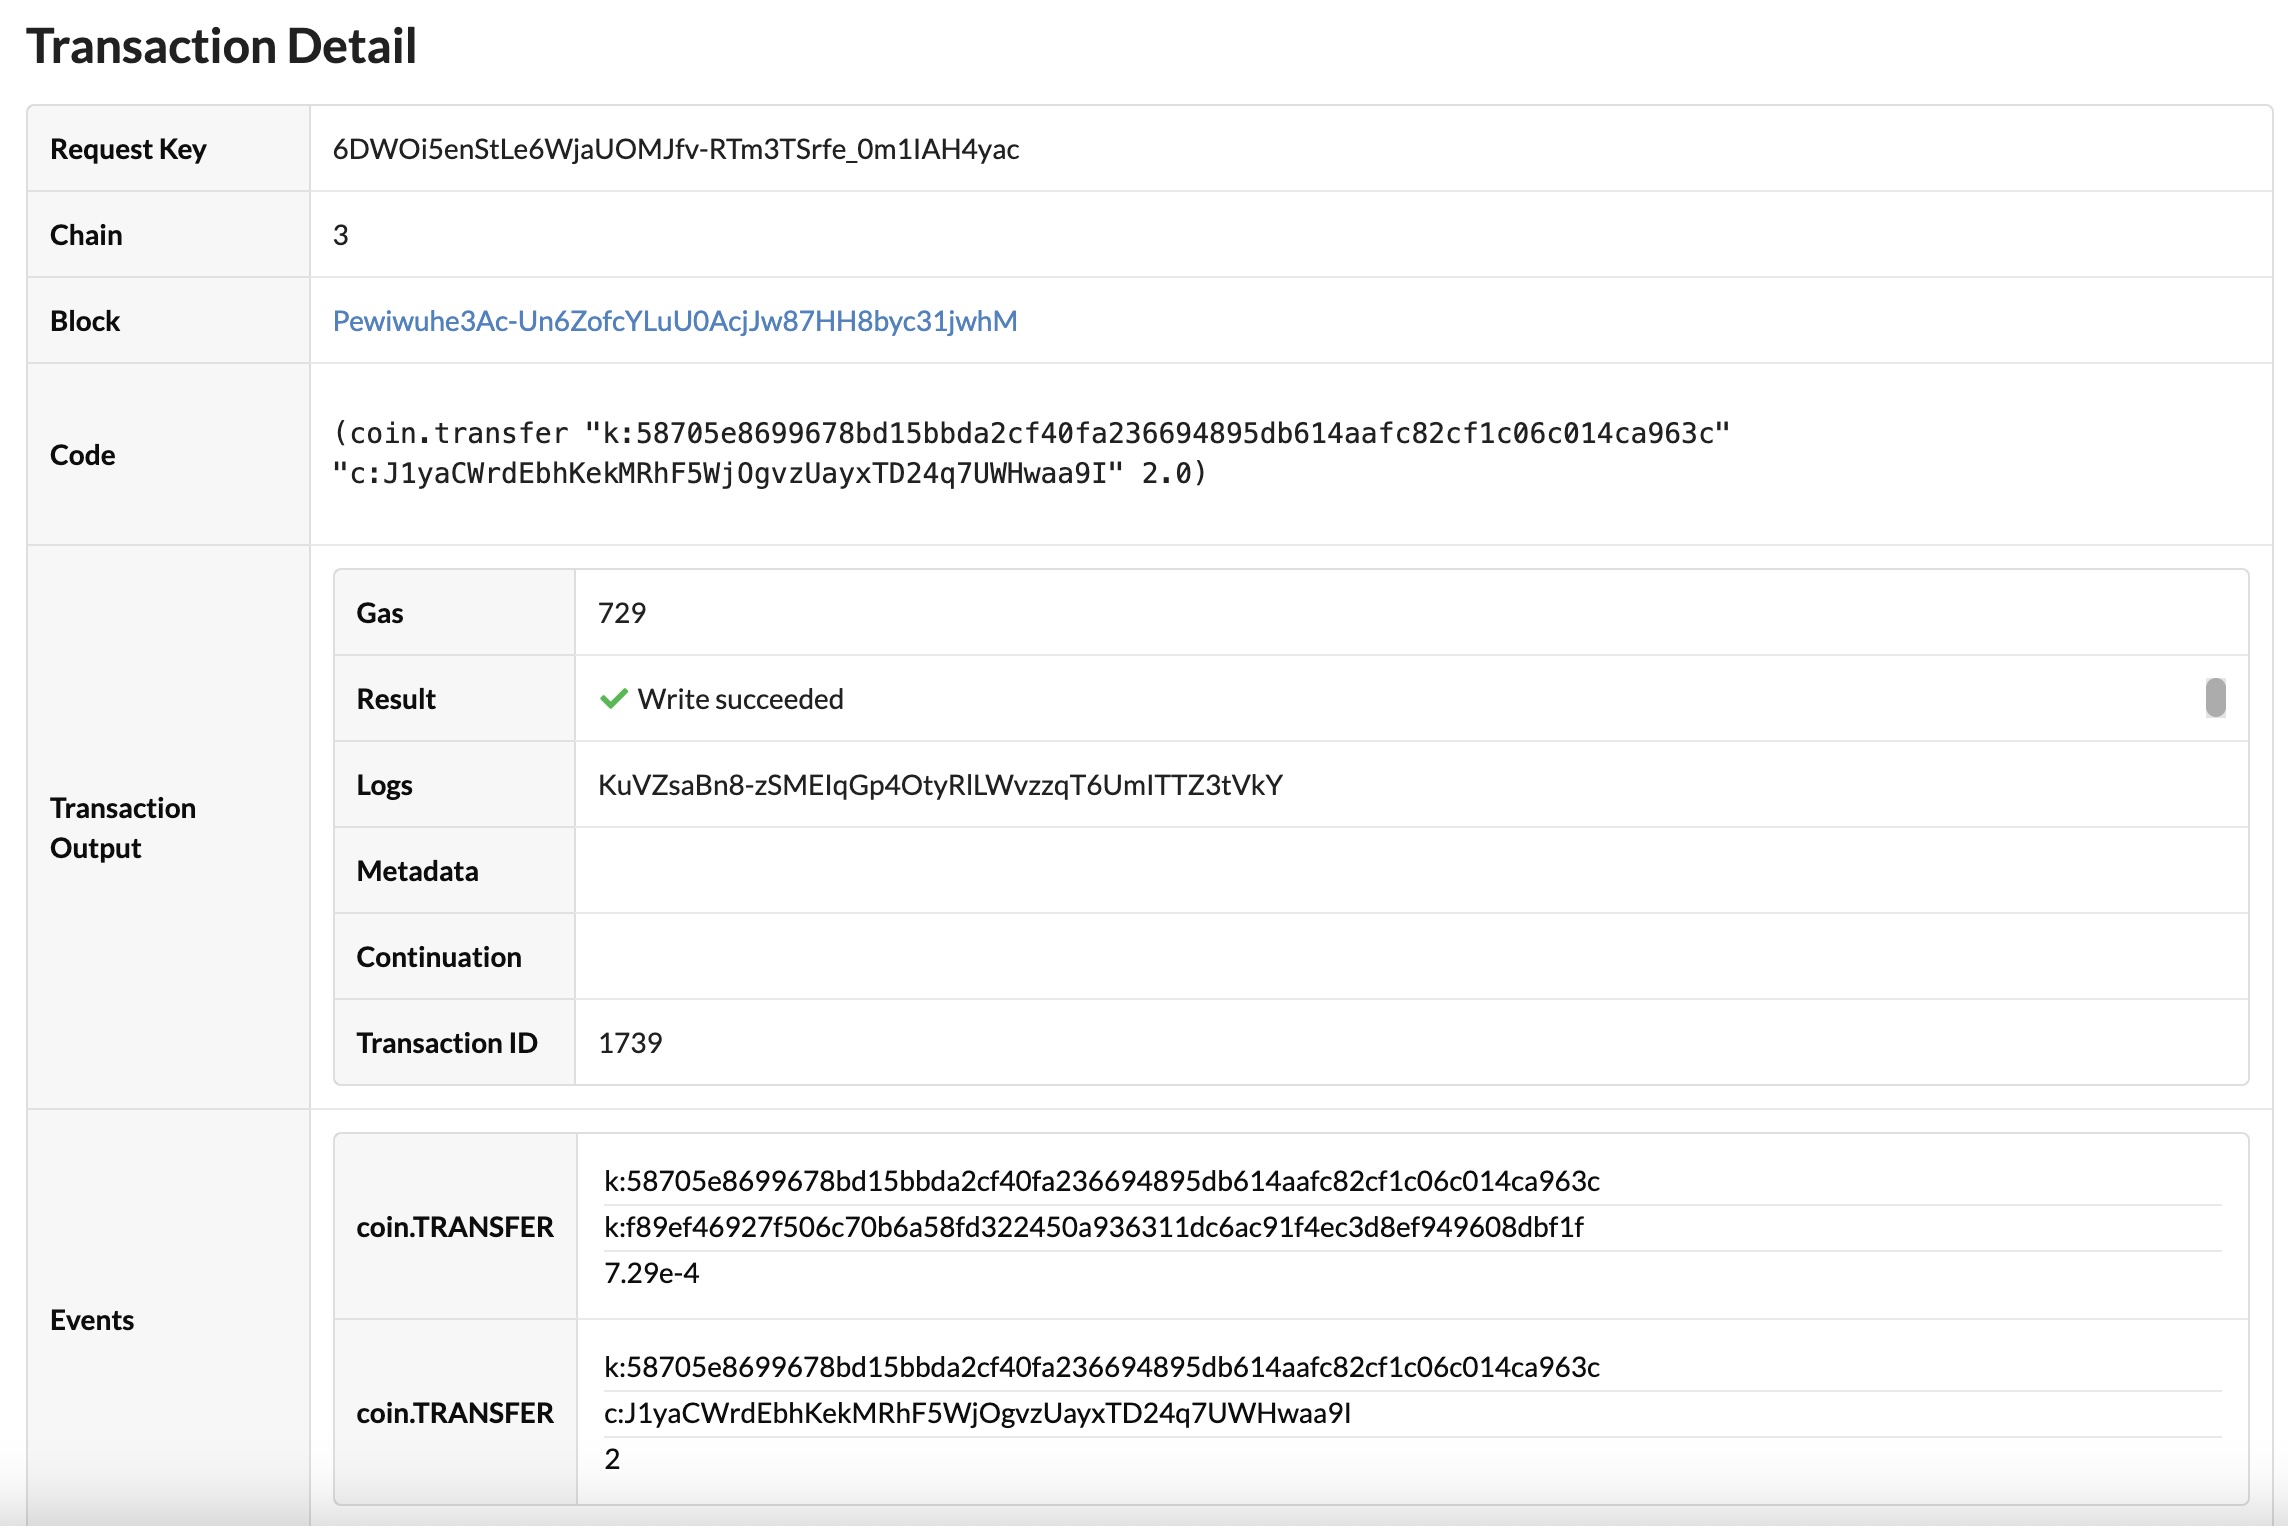
Transaction: 6DWOi5enStLe6WjaUOMJfv-RTm3TSrfe_0m1IAH4yac submitted with request key: 6DWOi5enStLe6WjaUOMJfv-RTm3TSrfe_0m1IAH4yacAfter the transaction is completed, you can check the results in the block explorer using the request key.
For example, you can open the local block explorer for the development network to view recent transactions:

You can click the link matching the transaction request key to see the details about the funding transaction:
Review
This project demonstrated how to create a capability-guarded principal account to hold funds. This account can be used to pay for transactions on behalf of other users. The project also provided a simple example for restricting the use of the gas station account based on a specific condition. In this example project, the gas station module was deployed on the development network and chain 3 with funds from a Chainweaver wallet account.